Quick Start guide
Quick start guide
1.
2.
3.
After creating your account
After creating your account, you will first be able to receive orders from Buyers after making an Online Linesheet. This guide will guide you through the process.
Maker settings
We will start by completing the initial maker information set up.
Click the purple ‘Select’ button.
Click the red ‘Go to Maker Settings page’
■ Accessing Maker settings from a Brand page
Click on ‘Maker Settings’ in the upper left > ‘Open Maker Settings’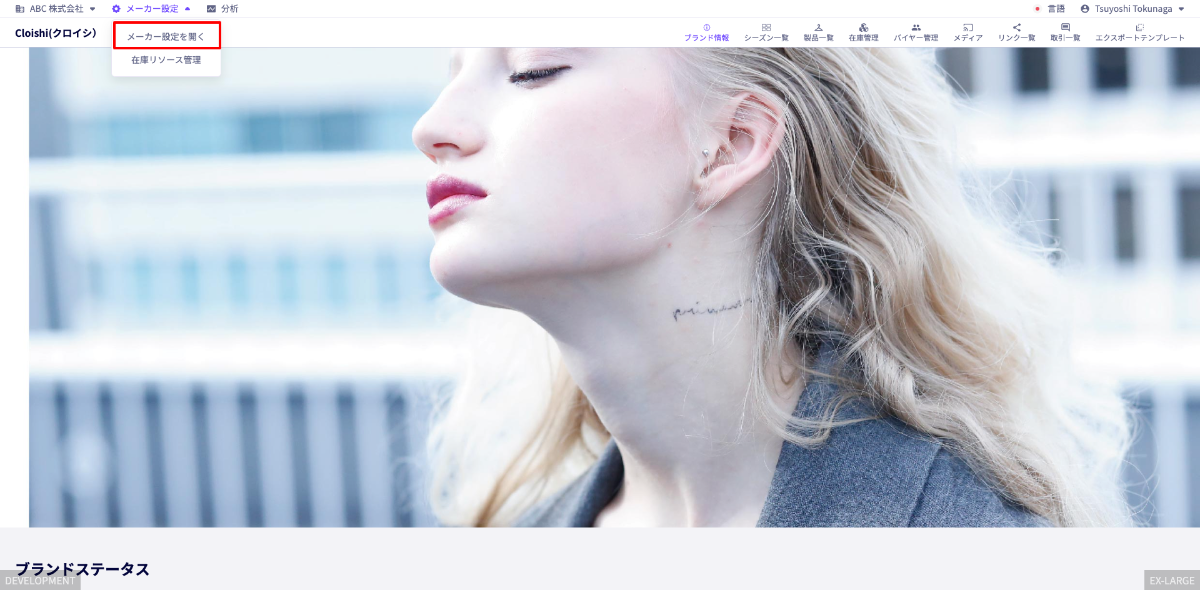
We will now set up the following 9 sub headings seen in the red box below.
※ ‘General’ ‘Office’ ‘Config’ ‘Tax List’ Are all sections that are required to be filled in.
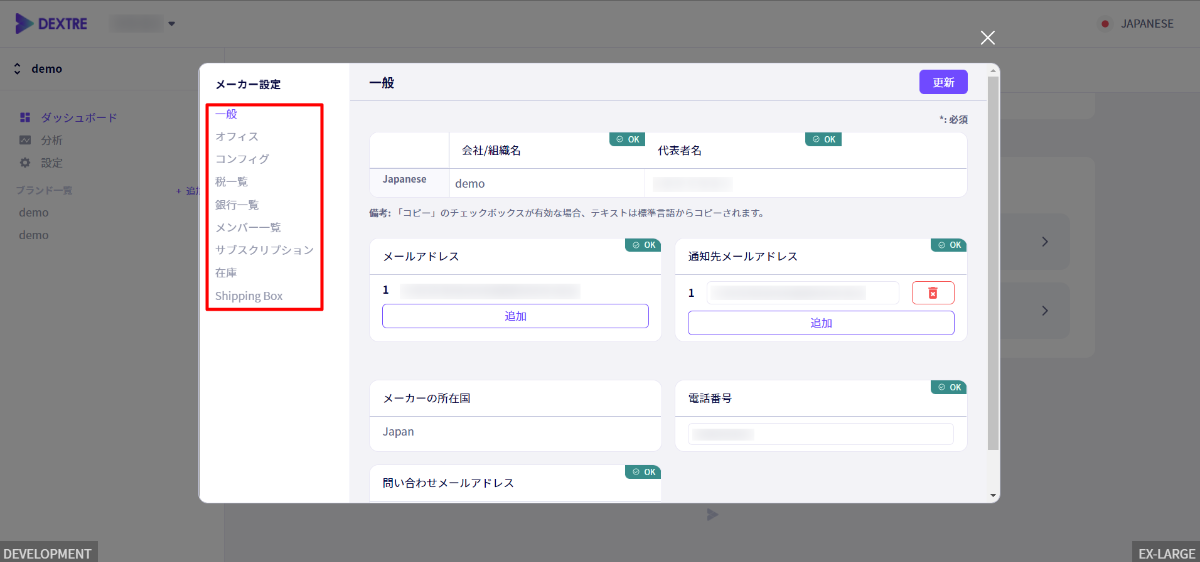
Step 1: General
Here you can fill in basic information about your company. (The company name, name of the Representative, Email addresses, Recipient email addresses, Country of the maker and phone number.
All fields under the general sub-heading are required fields.
① Click on ‘General‘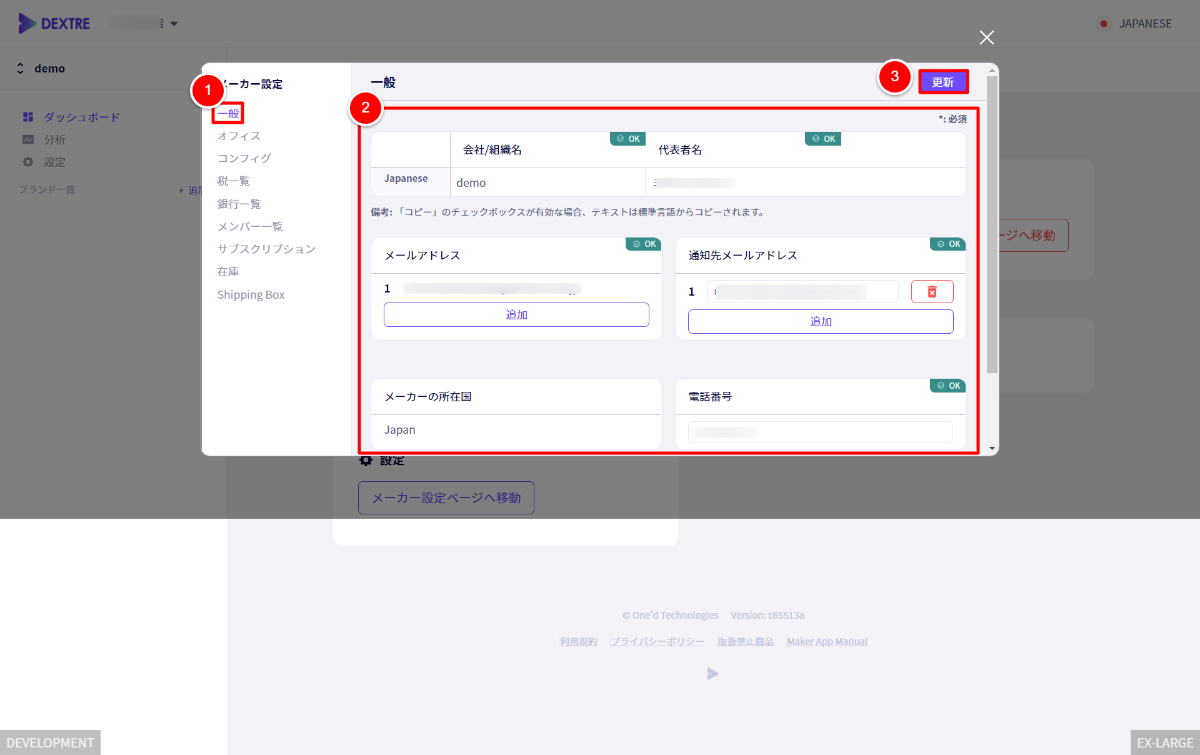
②Fill in your Maker/Company information in the red box as seen above.
You are able to add multiple Email and Email Recipient Addresses.
③Click on the purple ‘Update‘ button.
Step 2:Office
Here you can fill in basic information about your office and address.
The fields under the ‘Office’ sub-heading are all required fields.
① Click on ‘Office‘
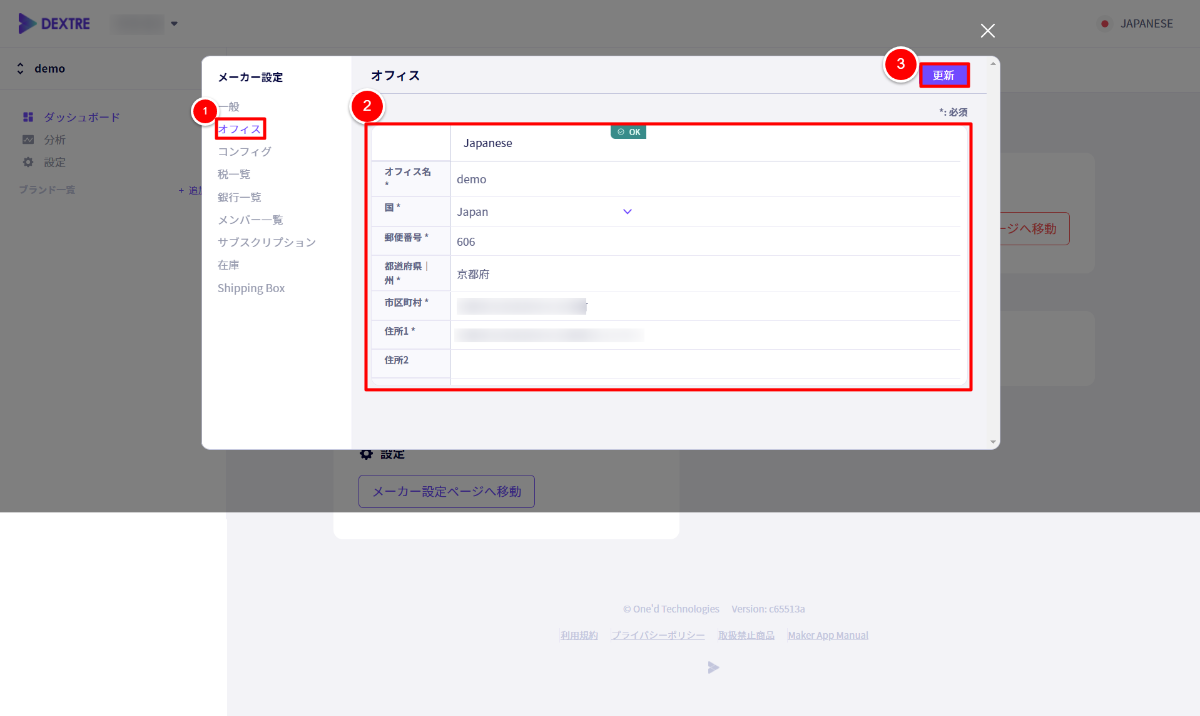
②Fill in your Office/Company information in the red box as seen above.
If you have only one address there is no need to fill in a second one.
③Click on the purple ‘Update‘ button.
Step 3:Config
Here you can set up your Language, Currency, Billing and Transaction Terms, as well as Transaction Management.
The fields under the ‘Office’ sub-heading are all required fields.
① Click on ‘Config‘
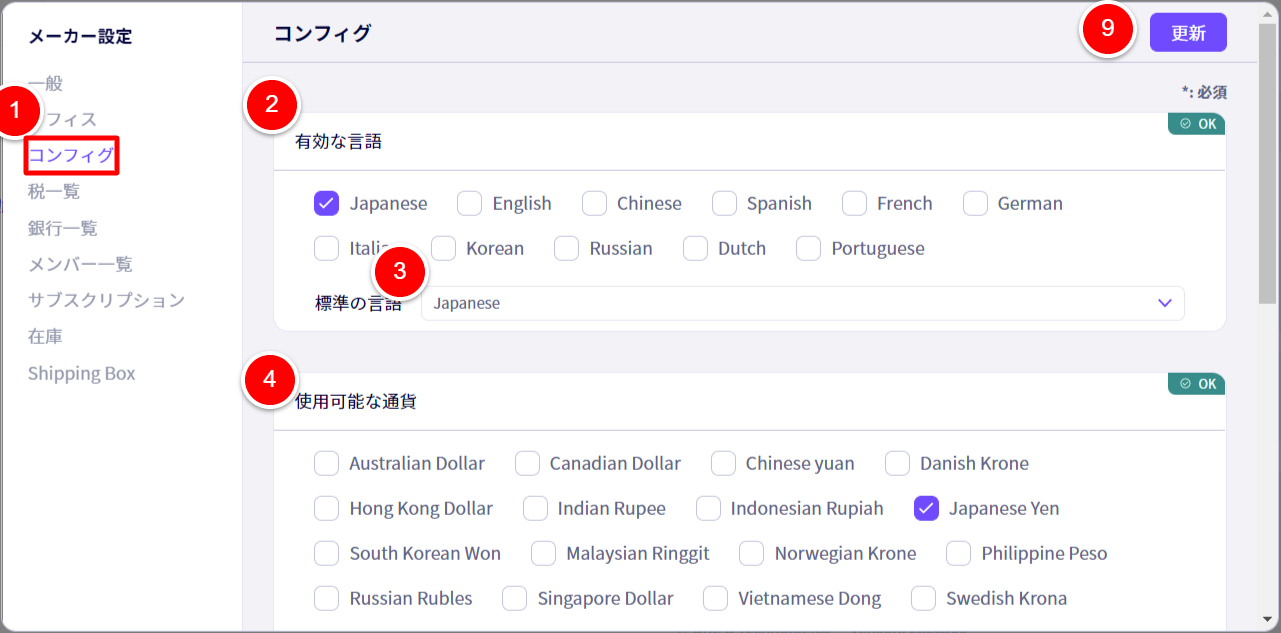
②【Enabled Languages】Here you can enable or disable languages to use in transactions. Enable all languages you will use during transactions.
③【Default Language】Here you can set your default language.
※If you selected multiple languages in ② including English, it is recommended you set the default language to English.
④【Enabled Currencies】Here you can enable/disable currencies to use in transactions. Enable all currencies you will use.

⑤【Default Currency】Enter your companies default/standard currency here.
⑥【Billing Terms】Here you can choose if you wish to set deposit settings for transactions or not.
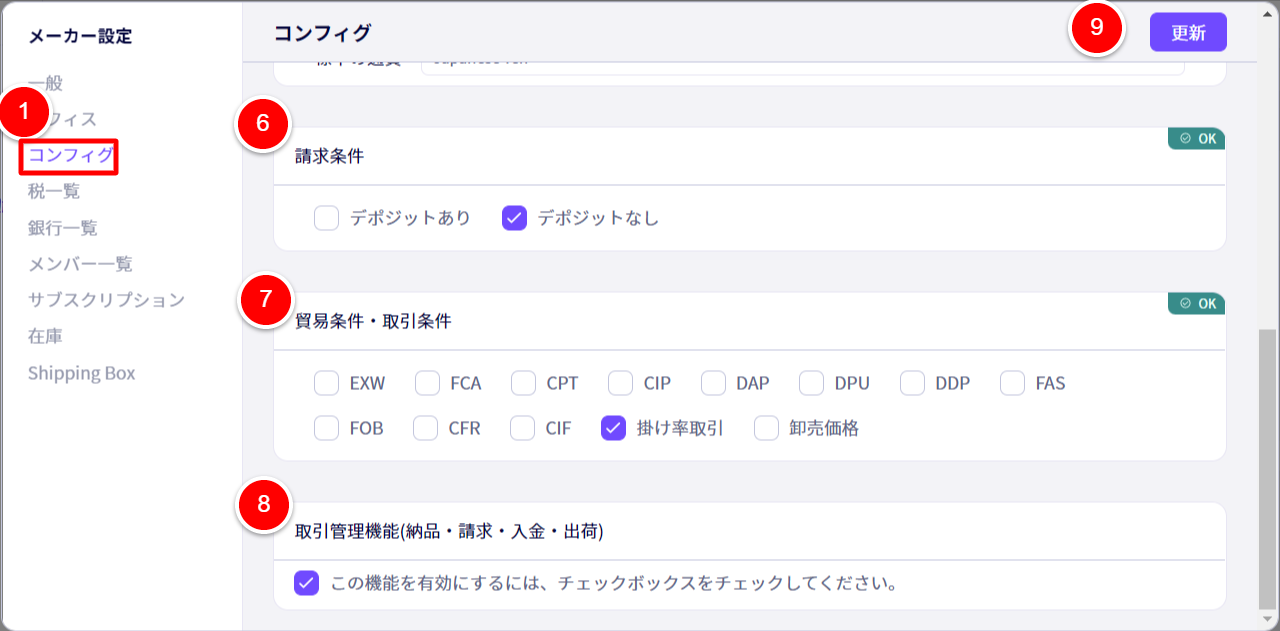
⑦【Transaction Terms】Please enable the transaction terms you wish you to use here.
⑧【Transaction Management(Delivery, Billing, Payment, Shipping)】If enabled, you will be able to create statements of delivery, among other things.
※This is disabled by default. if you do not need to create statements of delivery, etc, please feel free to leave it disabled.
Step 4:Tax List
Here you can set up tax terms.
All fields under the ‘Tax List‘ heading are required fields.
① Click on ‘Tax Lists‘
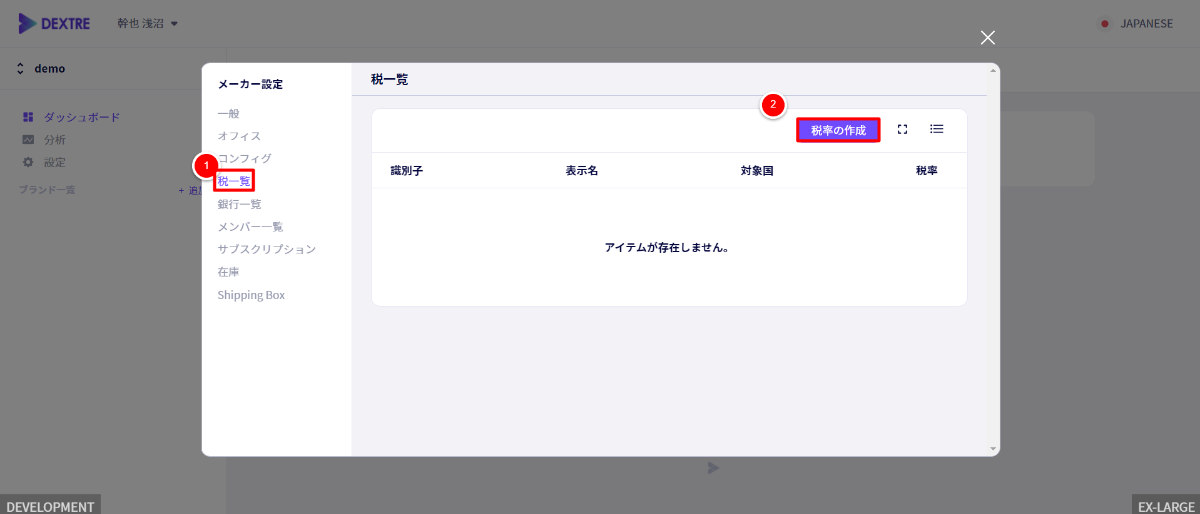
② Click on ‘Create a New Tax Rate‘
-DEXTRE-2-3.png)
① TAX IDENTIFIER
E.g)TAX10
This identifier used when setting up other systems
② TARGET COUNTRY
※ Select the country where this tax rate may be applied
③ TAX RATE
※ Enter the tax rate here
④DISPLAY NAME
※ The name displayed in each language enabled for this tax rate.
Step 5:Banks
Here you can enter your bank details.
① Click on ‘Banks‘
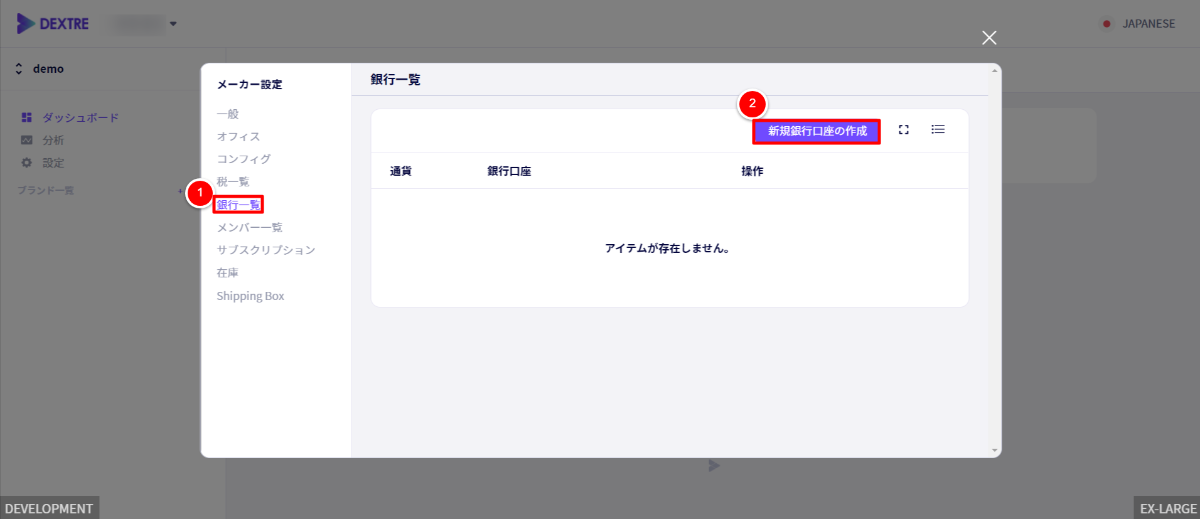
② Click on the purple ‘Create a New Bank‘ button.
you will be directed to this screen after clicking on ‘Create a New Bank‘
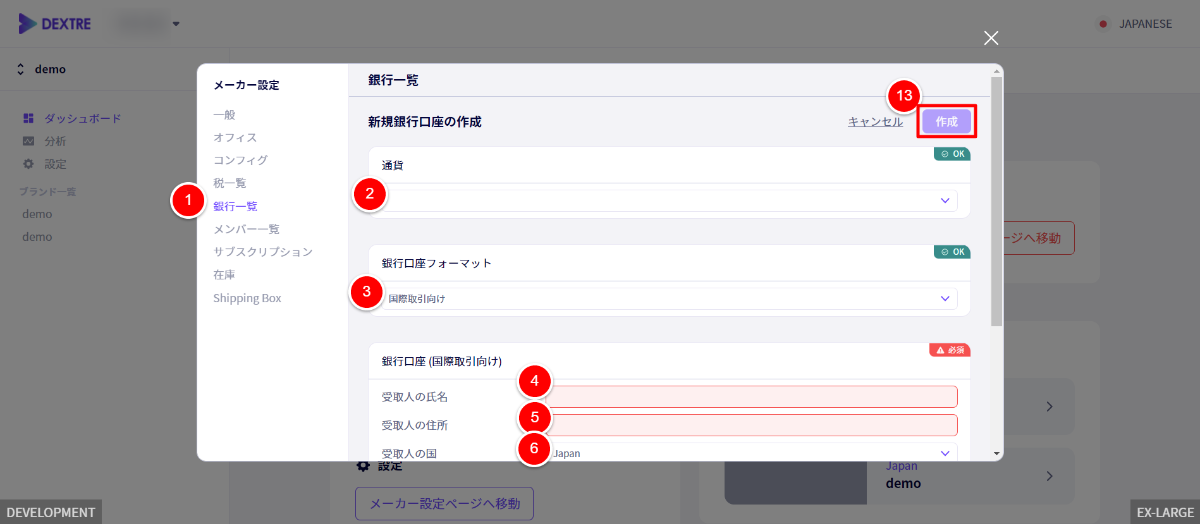
②Enter the currency of the Bank account.
③Set up the ‘Bank Account Format’ here.
※Please choose from ‘For international transactions’, ‘For transactions in Japan’ or ‘Custom Format’
Fill in the information from ④ to ⑪
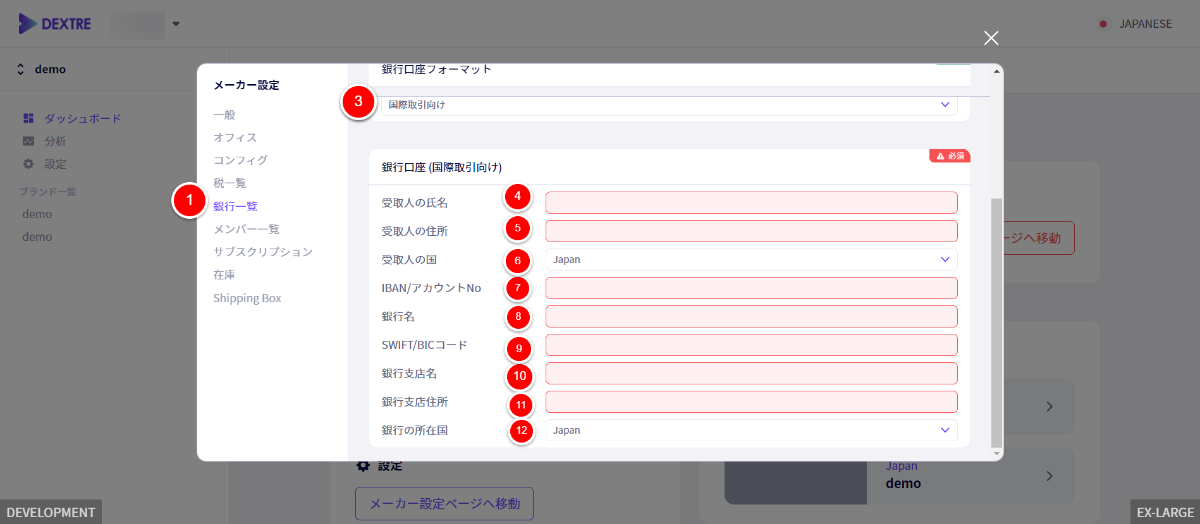
⑦ input IBAN information here.
⑨ Input SWIFT/BIC Code information here.
⑬ Click ‘Create‘ after filling in information between ② and ⑪.
Step 6: Contact Addresses
Here you can set up your Members information. From this sub-heading, you can invite, edit and delete members from your organisation, as well as check invite status.
① Click on ‘Members‘.

② Click on ‘Invite a new member‘ You will be redirected to the following screen.
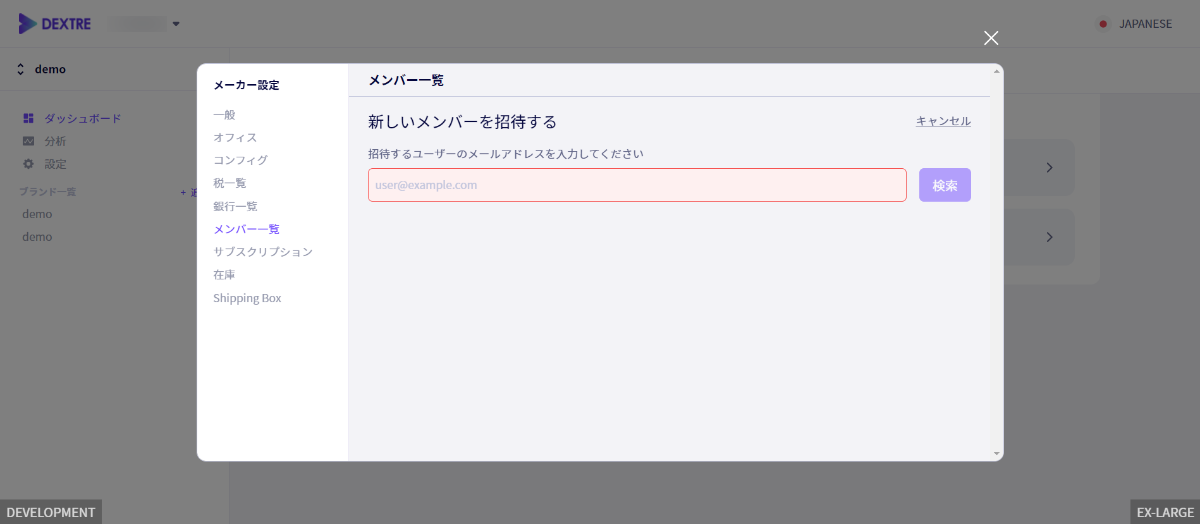
Enter the email addresses of members you wish to invite.
③ ‘Edit‘ Here you can edit individual members privileges.
After pressing the purple button ‘Edit’ you will be redirected to this screen.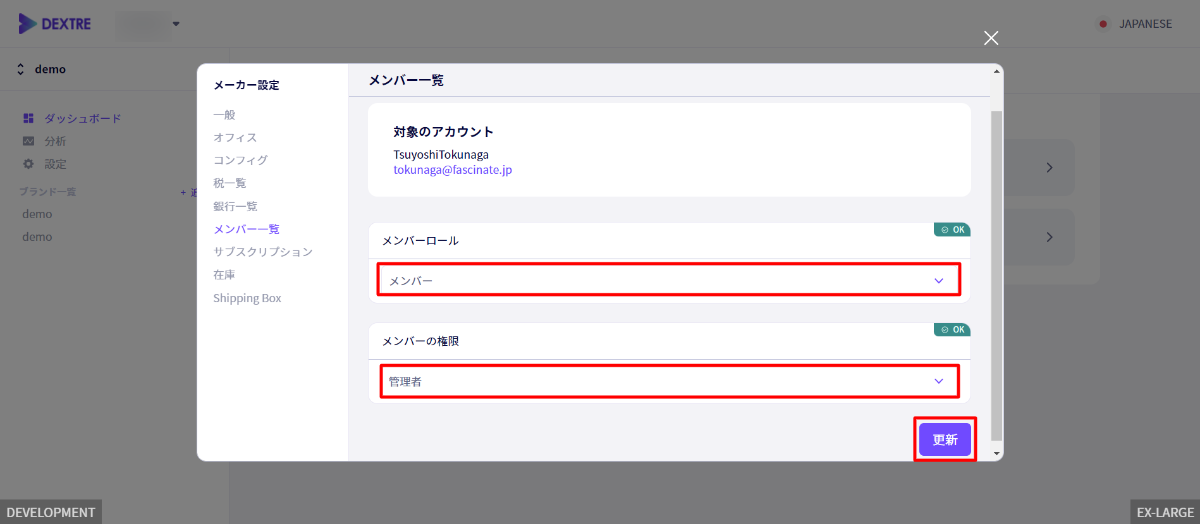
‘Member Role‘ Here you set the member as an ‘Owner’ or just a regular ‘Member’
‘Member Permissions‘ Here you can set the members permission to Admin, Write only or Read only.
※Write only means the ability to edit content.
※Read only means the ability to view content only.
④ ‘Remove‘ This button is used to remove members.
Step 7:Inventory
Here you can set up Inventory Management. This is optional.
① Click on ‘Inventory‘.
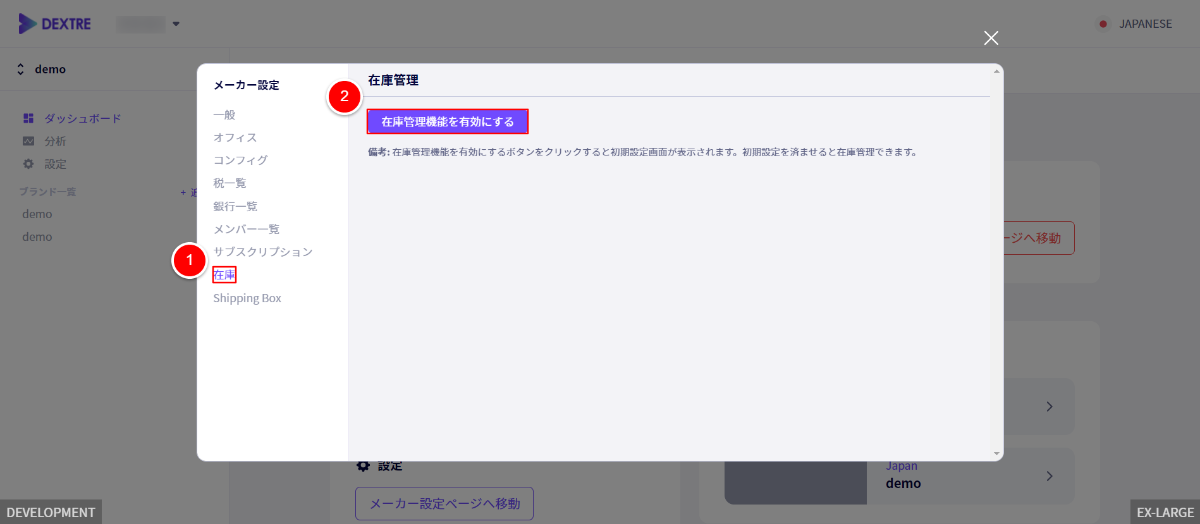
② Click on the purple button titled ‘Enable Inventory Management‘. You will be redirected to the page below.
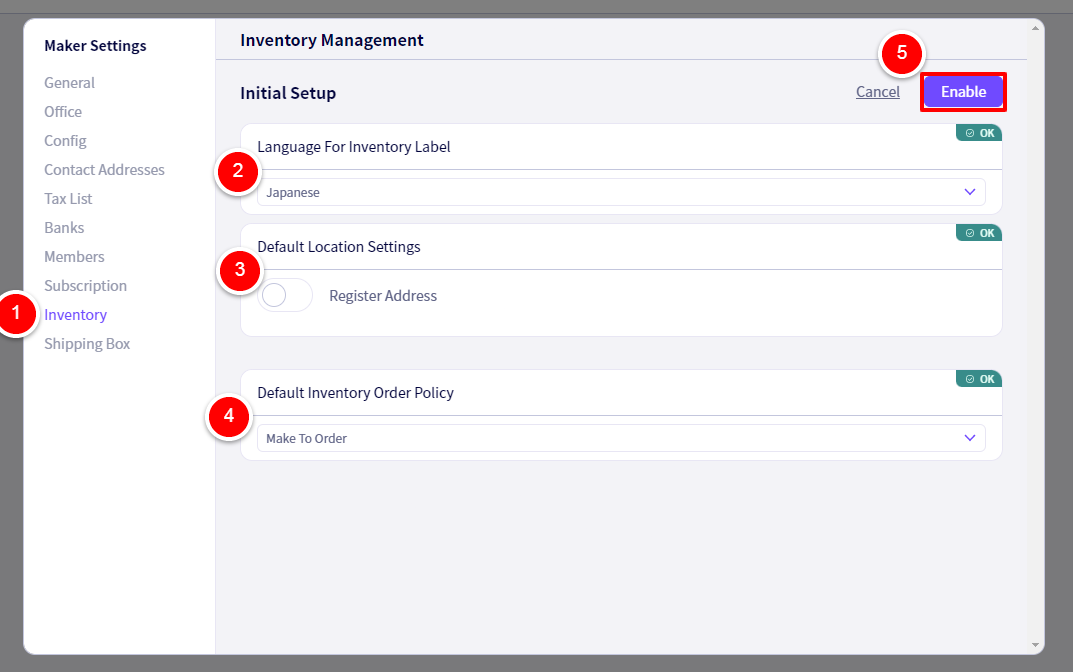
② ‘Language for Inventory Label‘ Select what language you wish to use for labels while using the Inventory Management feature.
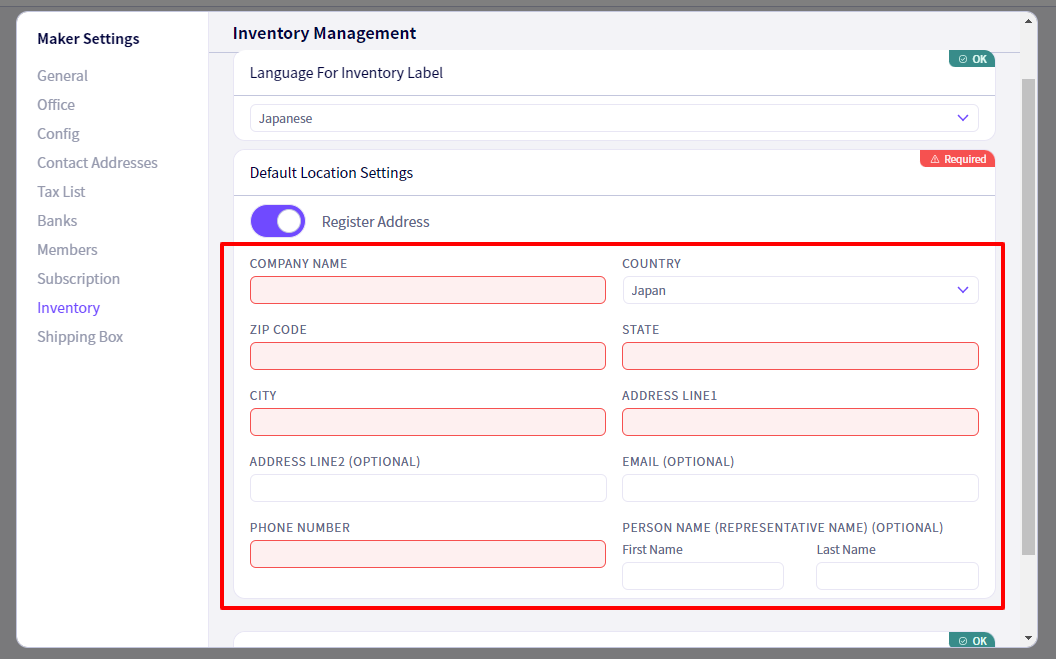
③ ‘Default Location‘ Turn this on if you wish to register a location.
※After turning this feature on you will be presented with the following fields to fill in.
④’Default Inventory Order Policy‘ From here, you can choose what sort of management you would like applied to orders until completion. (Inventory Order, Inventory Order and Backorder, Make to Order, Pre Order)
Step 8:Shipping Box
Here you can set up the Shipping Box function. This is optional.
① Click on ‘Shipping Box‘.
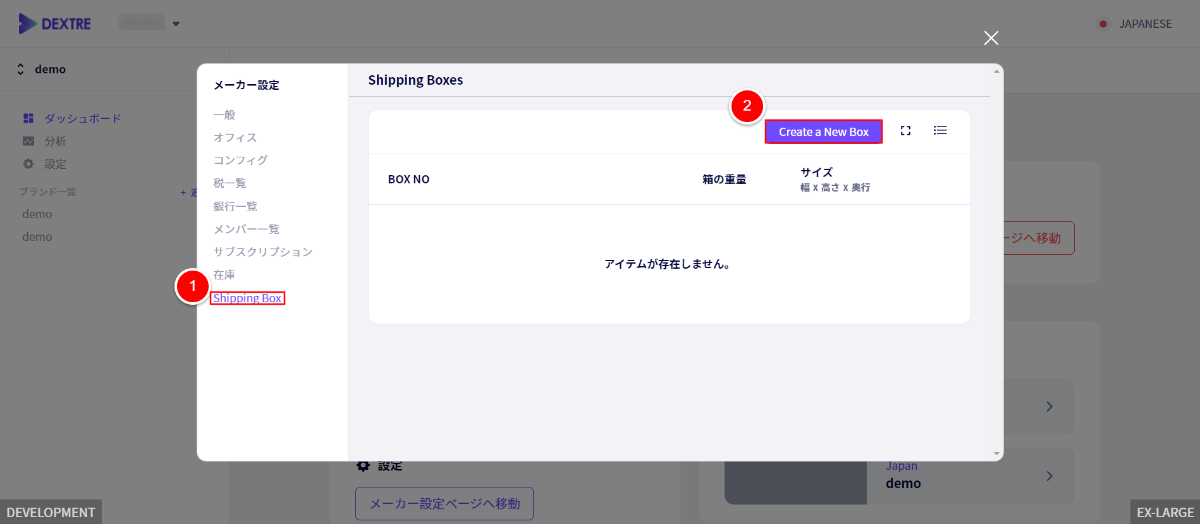
② Click on the ‘Create a New Box‘ button. You will redirected to the page below.

③Fill in all the information in the red box as seen above. Here you can input the Box No., Description, Weight and Size
④ Click on the purple ‘Create‘ button.
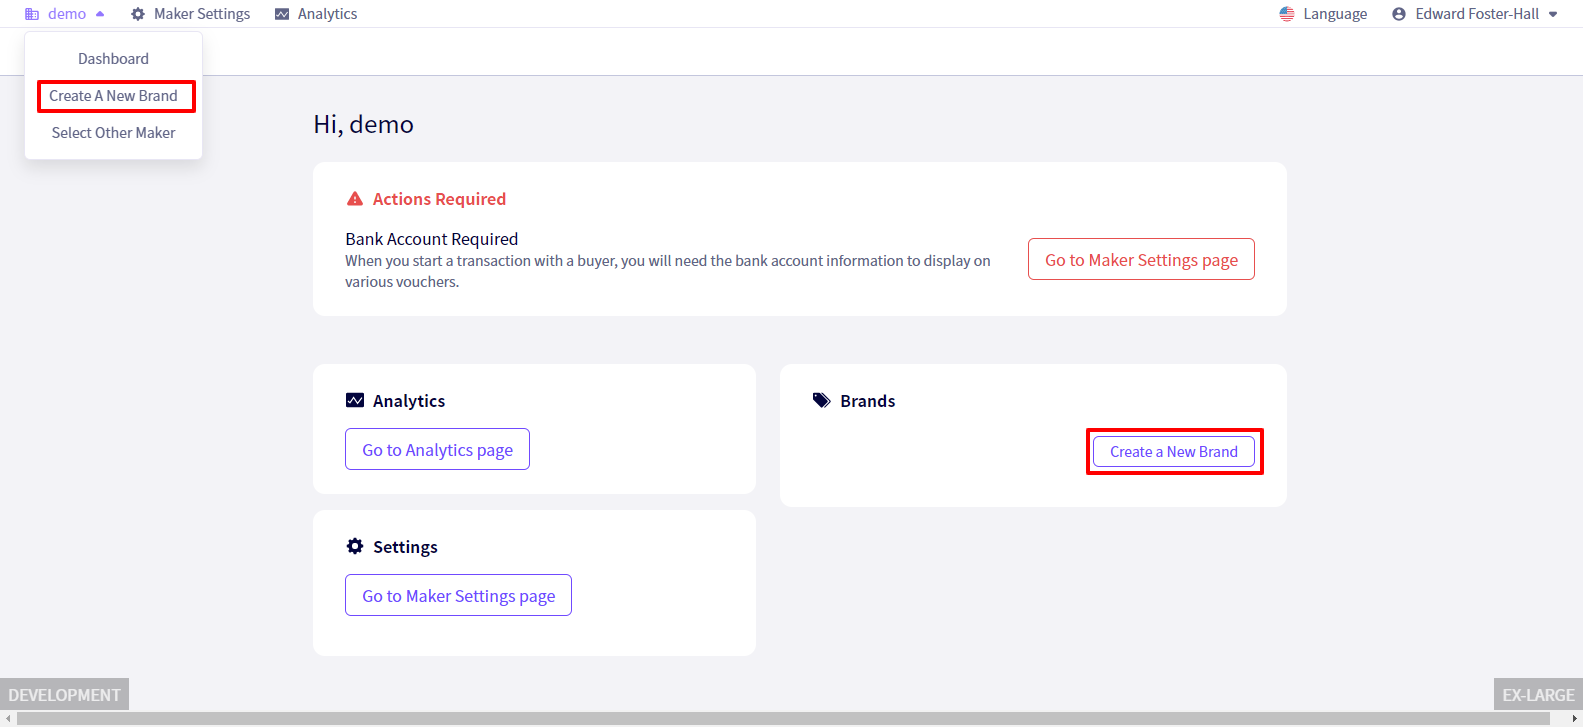
Create a New Brand
First, click one of the ‘Create a New Brand‘ buttons as shown in the red rectangles below.
Step 2 Basic Setup, Media Setup
From here you can set the Brand Name, Brand Description, Videos as well as Logo and Image settings.
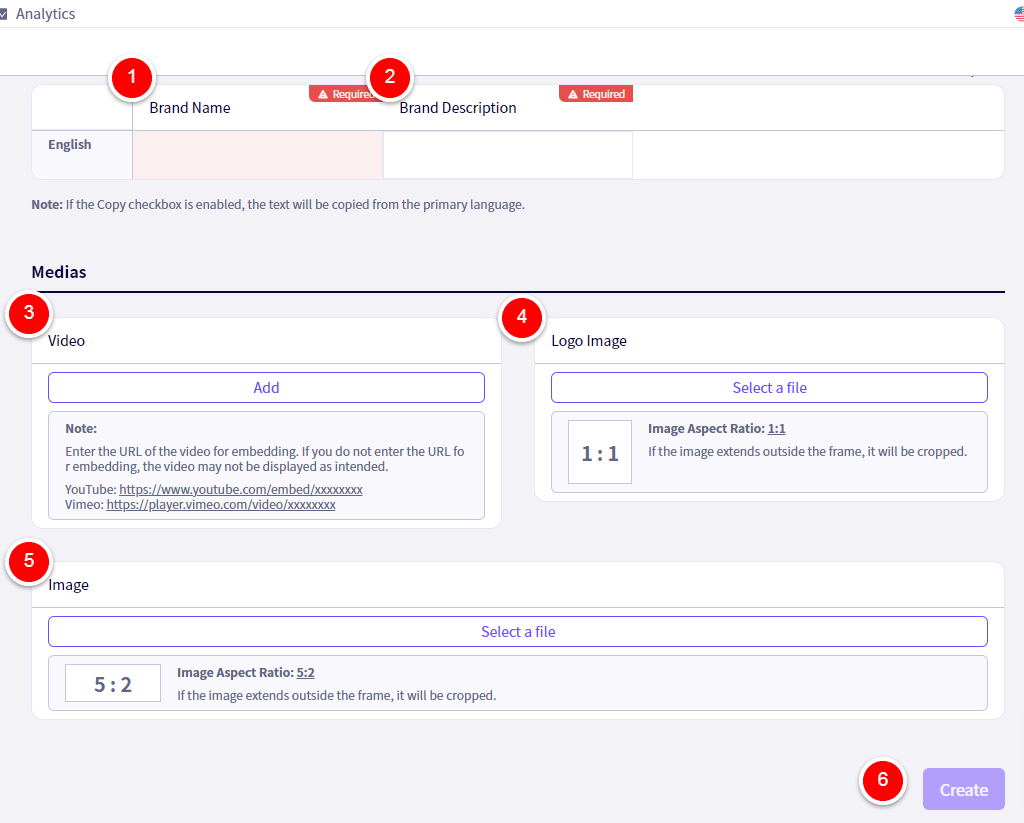
① Enter the ‘Brand Name‘ here.
※ You will be able to enter the Brand Name in all languages you had previously enabled.
② Enter the ‘Brand Description‘ here.
※ You will be able to enter the Brand Description in all languages you had previously enabled.
※ There is no word limit.
③ Here you can add videos. You will need to supply the embed URL from sites like Youtube or Vimeo. for more information, look here
④ Here you can set your Logo Image. This will appear on Linesheets, both online link and PDFs, as well as in the ‘Cart’ on the buyer side.
※The recommended size is、300px ×300px (Aspect Ratio 1 : 1 )
⑤ Here you can set your Header Image.
This will be shown on the buyer side when selecting a brand on your top page.
※ The recommended size is 1920px × 768px (Aspect Ratio 5: 2 )
⑥ After filling in all of the fields, press the purple ‘Create‘ button.
Setting up for product registration
Before registering products, you will need to set up the attributes you will give to your products to manage them. For example Color, Size, Categories, etc.
Click on ①’Products‘, followed by
②’Product Attributes‘.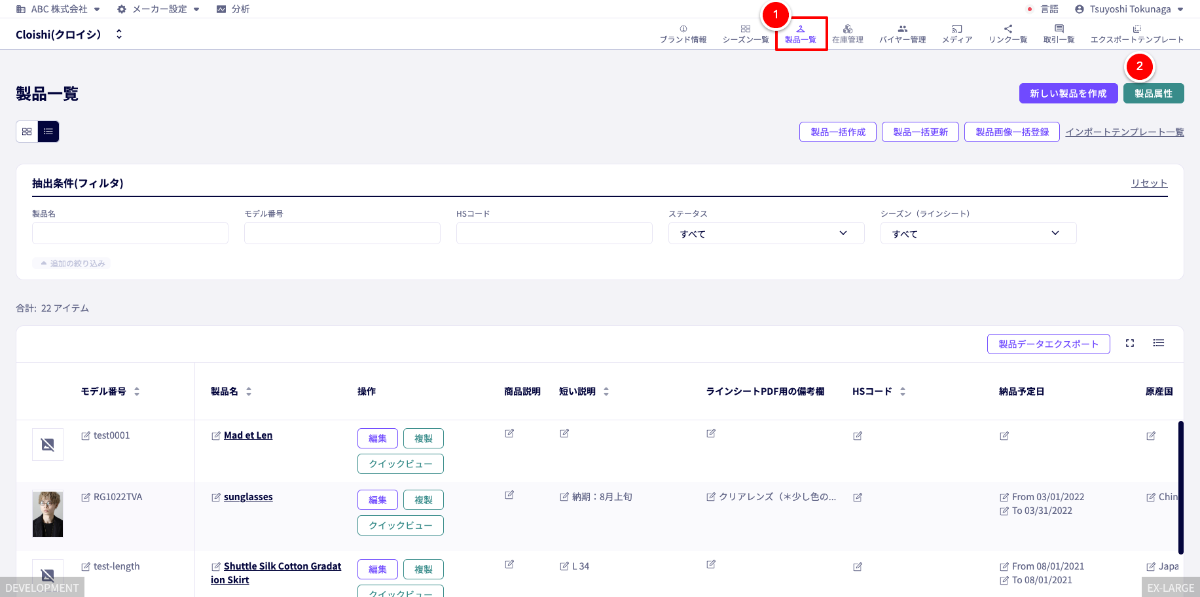
About SKU Property Settings
SKU properties are attributes like color and size you use to manage and differentiate products. For example, you could make SKU properties of ‘Leather’, ‘Color’ and ‘Size’. You can use this combination of properties later when you create a SKU Template, which we will go into later.
Click on ①② ‘SKU Properties‘ in order.
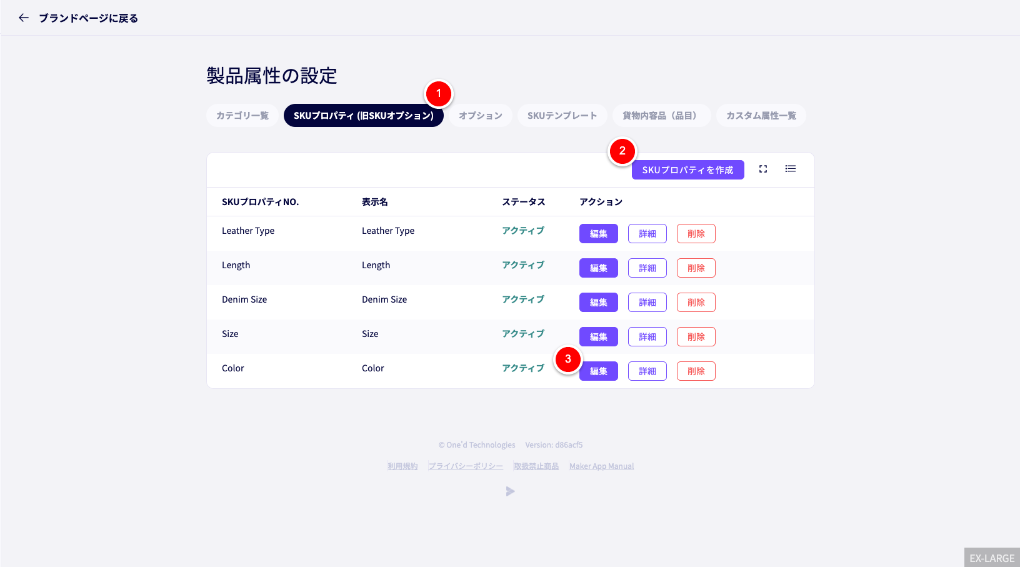
You will be redirected to the following screen.
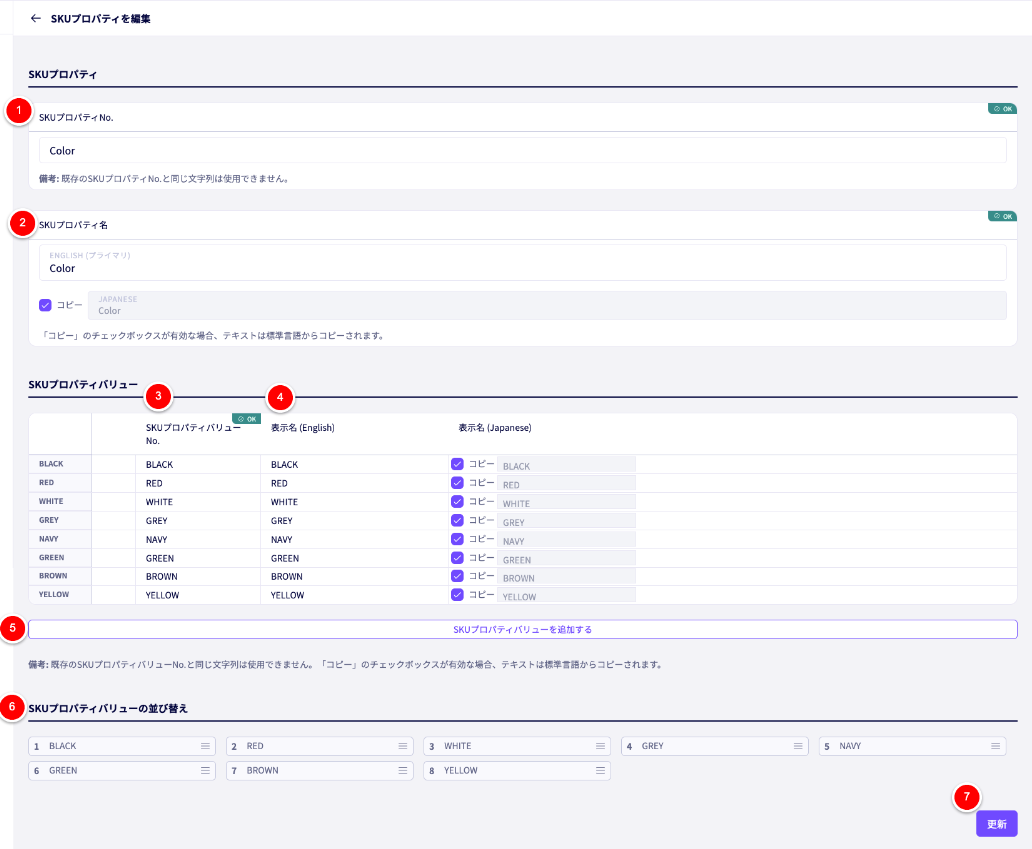
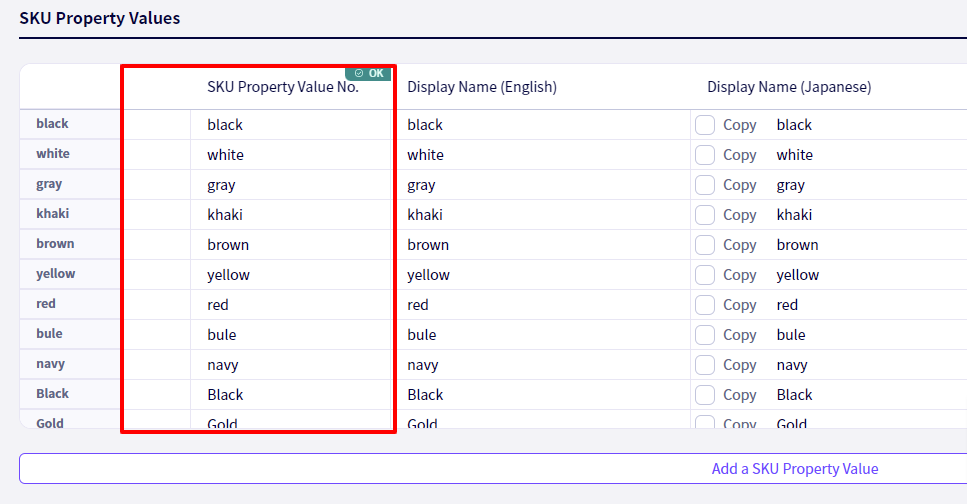
The example above is settings up colours.
① ‘SKU Property No.’This is the name the system will use to recognize this SKU Property, which you will need to use for bulk product registration, etc.
② ‘SKU Property Name’This is the name that will be seen by buyers as part of the products information. It will be reflected on Billing Invoices, etc.
③ ‘SKU Property Value No.’ This is the identifier the system will use. You will need to use it for bulk product registration, etc.
④ ‘Display Name’This is the name that will be shown to buyers and reflected on Billing invoices, etc.
⑤ ‘Add a SKU Property Value‘ If you press this button, you will be presented with more fields for you to add more variations to this property.
⑥ ‘Sort SKU Property Value‘Here you can drag and drop to reorder the values you have added.
① ‘SKU Property No.s’ are identifiers used in databases and systems to differentiate and identify products and their properties. They are used when exporting and importing data into DEXTRE
Click on ⑦‘Create‘
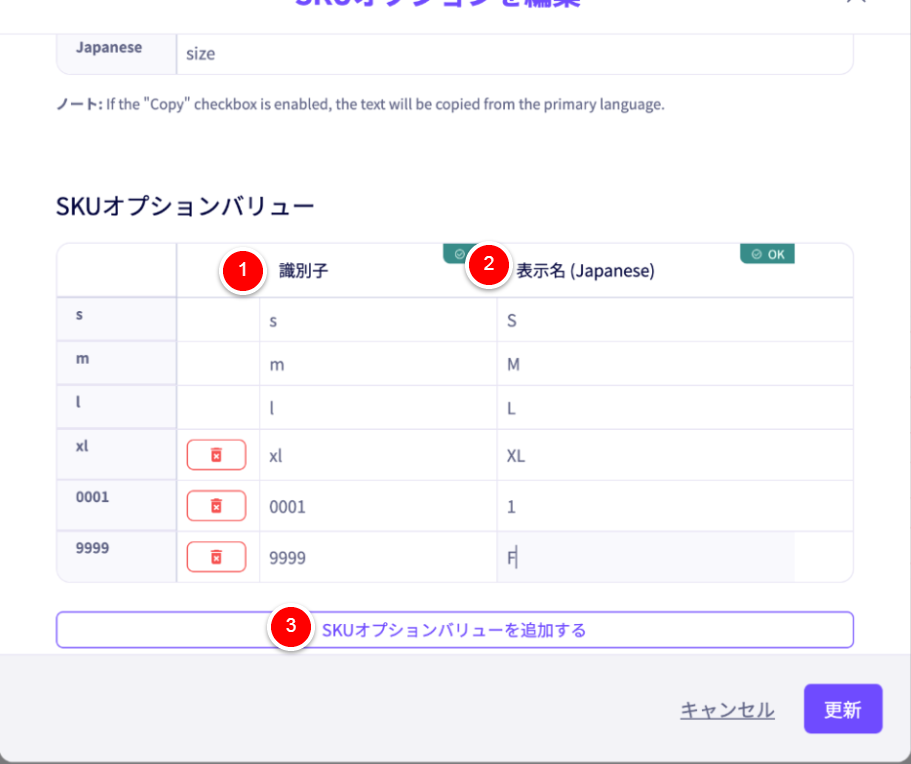
As an example, here is how a size SKU Property could be made.
Put the size code in ①‘SKU Property No.‘ and then the size name in②‘‘SKU Property Name’‘ If you select③‘ SKU Property Value No.‘ you will be able to add more identifiers.
Step 2: SKU Template settings
After you have made the SKU properties you will need, you now need to make a ‘SKU Template‘.
Click on ① , followed by ②
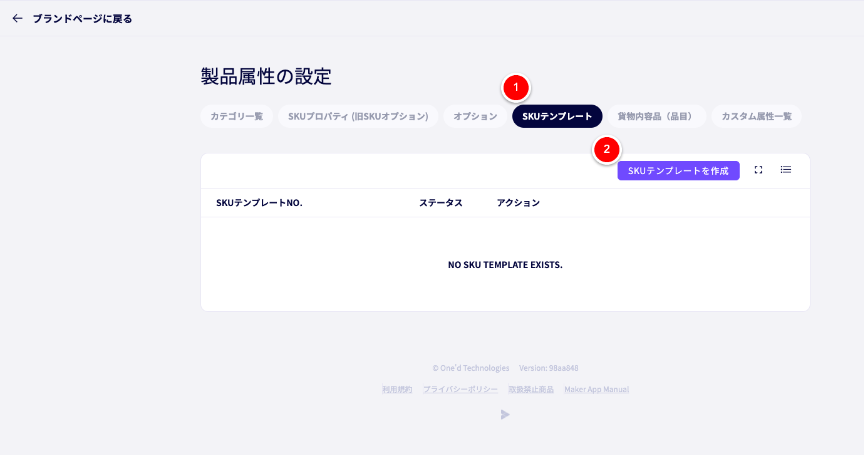
You will be redirected to the following screen.
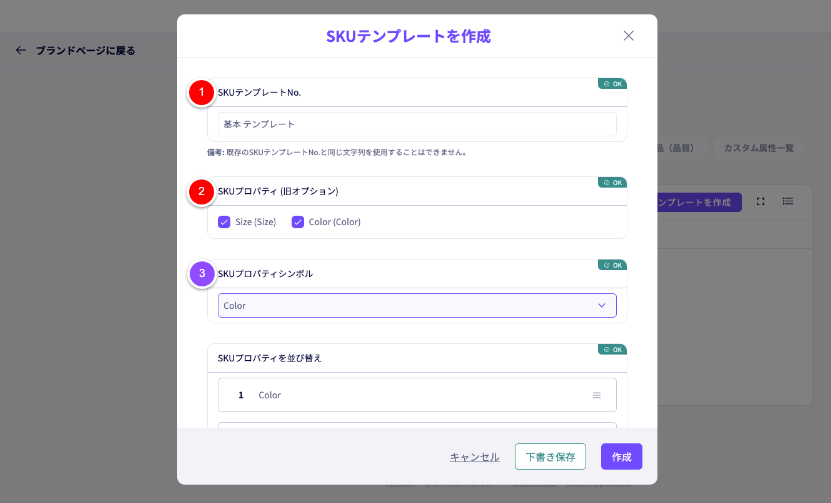
① ‘SKU Template No.‘ Add a name to the template.
② ‘SKU Properties‘ Select the SKU Properties you wish to use to add to this SKU structure.
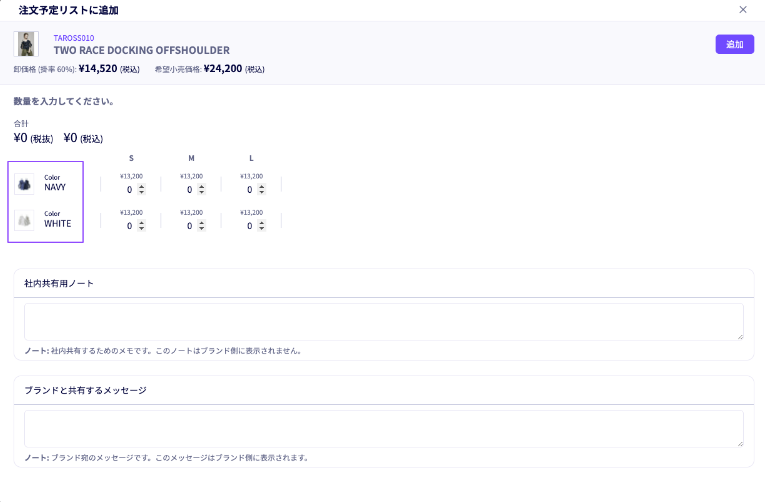
③ ‘SKU Property Symbol‘ Decide which SKU property you wish to use to organize photos of your products (Color, etc.)
※ Here is an example of the SKU Property Symbol, as seen in the ‘Cart’ section of the Buyer application.
※ Product details page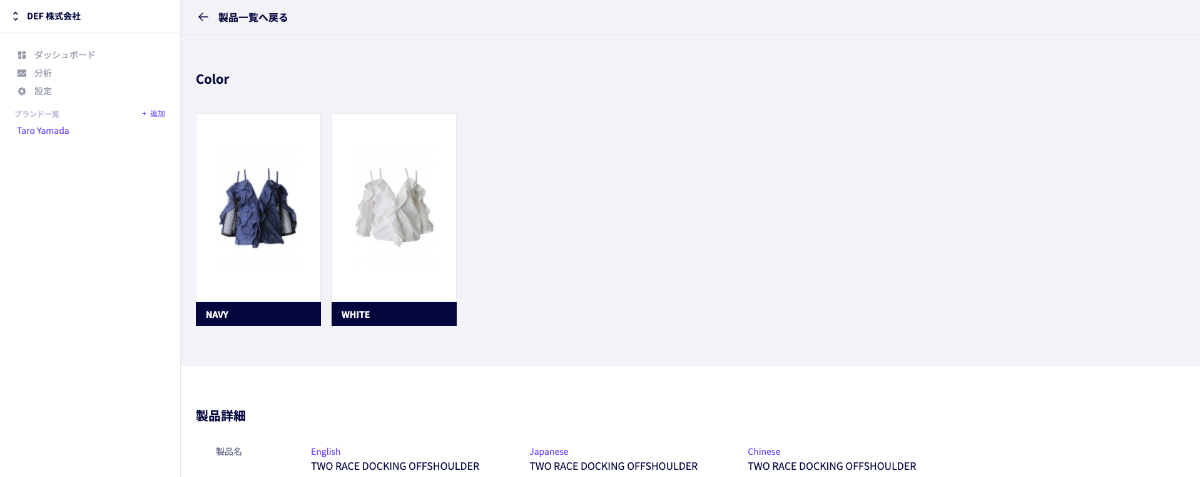
Step 3: Category Settings
Next we will set up Product Attribute Categories.
Categories are attributes that need to be managed by brand. Depending on the brand, the management and way they are displayed will change.
■ Category setup examples
1:Gender categories such as MEN/WOMAN/UNISEX
2:Item categories such as One piece/Jacket/Dress
3:Accessory categories such as Hats/Rings/Wallets
On top of this, you can add subcategories and subsubcategories.
■ A categorization example
1:(Category)WOMAN-(Subcategory)Jacket/Dress/One Piece
2:(Category)WOMAN-(Subcategory)Hat-(Subsubcategory)/CAP/KNIT/BUCKET HAT
We will use the example of:(Category)WOMAN-(Subcategory)HAT-(subsubcategory)CAP/KNIT for the following explanation.
To start, we must first set up the Category (The broadest option)
From ‘Product Attribute Settings‘ select ① ‘Categories‘.
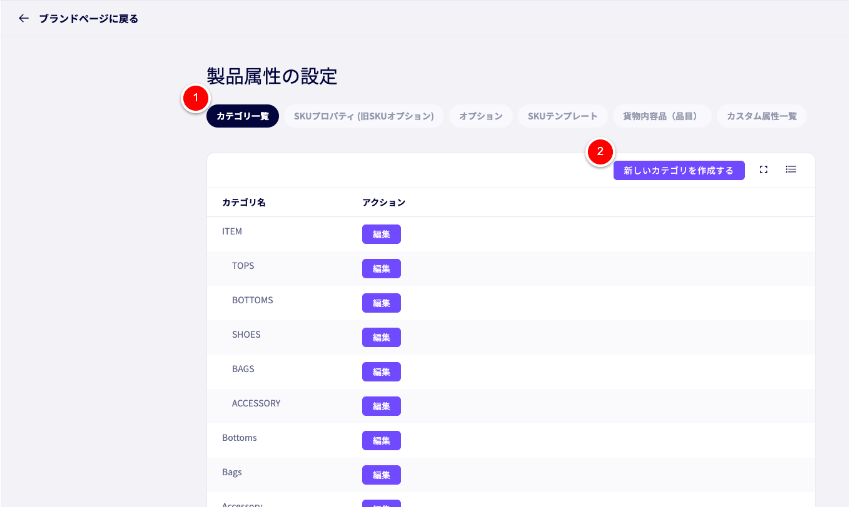
Click on ② ‘Create a New Category‘
Your screen will be redirected to the following.
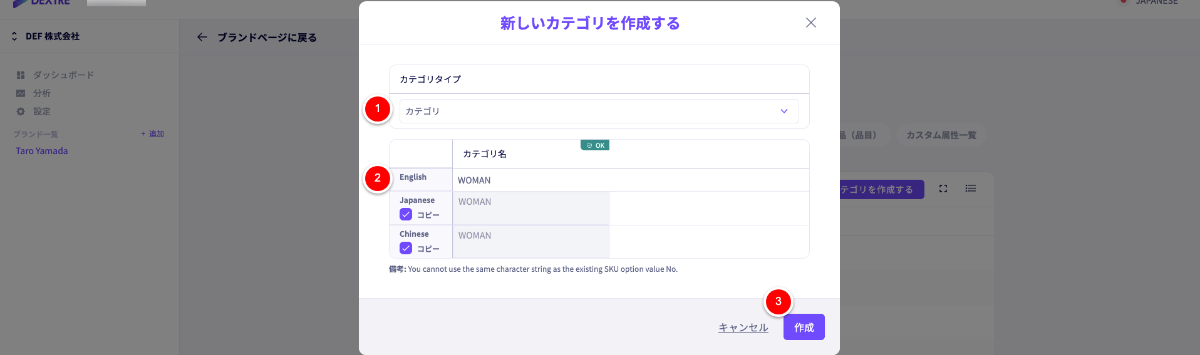
Next, from the ‘Category Type‘ heading, select ①‘Category‘ from the drop down menu.
Next, enter a ②‘Category name‘(For example, ‘WOMAN’)
After you have done this please click on ③‘Create‘.
Next we will set up our subcategories.
Click on ④’Create a New Category’

You will be redirected to the following page.
 From the ‘Category Type’ heading, Select ⑤‘Subcategory‘ from the drop down menu.
⑥ Select the Category you have just made (in our example ‘WOMAN’)
Next, Enter a ⑦ ‘Category name‘(For example, ‘HAT’)
After you have done this please click on ⑧‘Create‘.
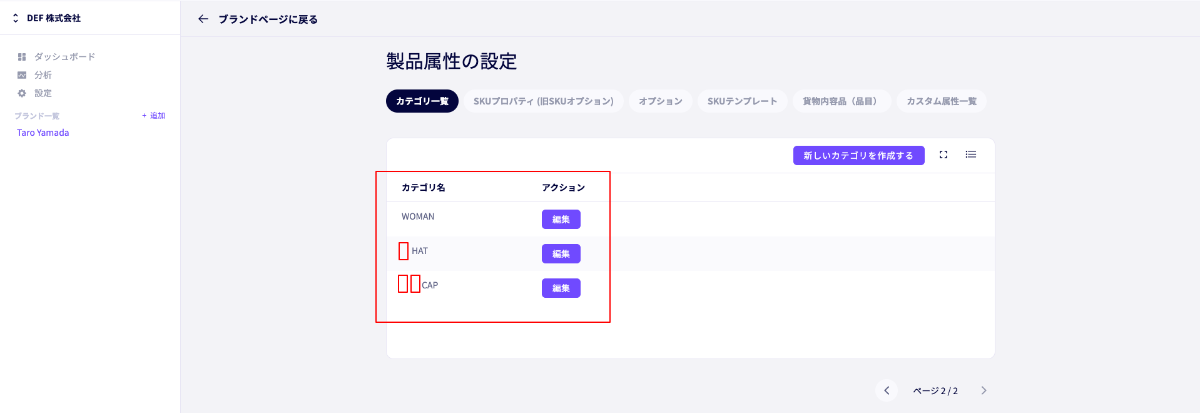
If you have completed the above steps successfully ‘HAT’ Should be indented to the right of, and under, ‘WOMAN’.

If you wish to further organize your products into categories, you can use Subsubcategories.
Click on ⑨’Create a New Category’ once again, you will be redirected to the following screen.

From the ‘Category Type’ heading, Select ⑩‘Subcategory‘ from the drop down menu.
Under the Parent Categories section, select ‘WOMAN’ as the ⑪’Category‘
and ‘HAT’ as the ⑫‘Subcategory‘
Next, Enter a ⑬ ‘Category name‘(For example, ‘CAP’)
You will be automatically redirected to the ‘Product Attribute Settings‘ page, so please check if your Categories, Subcatergories and Subsubcategories are indenting appropriately as seen below.
■ Reordering Categories
At the bottom of the page, you are able to rearrange the order of categories.
* Only the main categories are able to be reordered like this.

Step 4:Description Attribute Settings
‘Description Attributes‘は、Are used when making commercial invoices for exports. They will be the ‘Simple name’ used for products.
※ These Description attributes, after being set up, will need to be applied to each product.
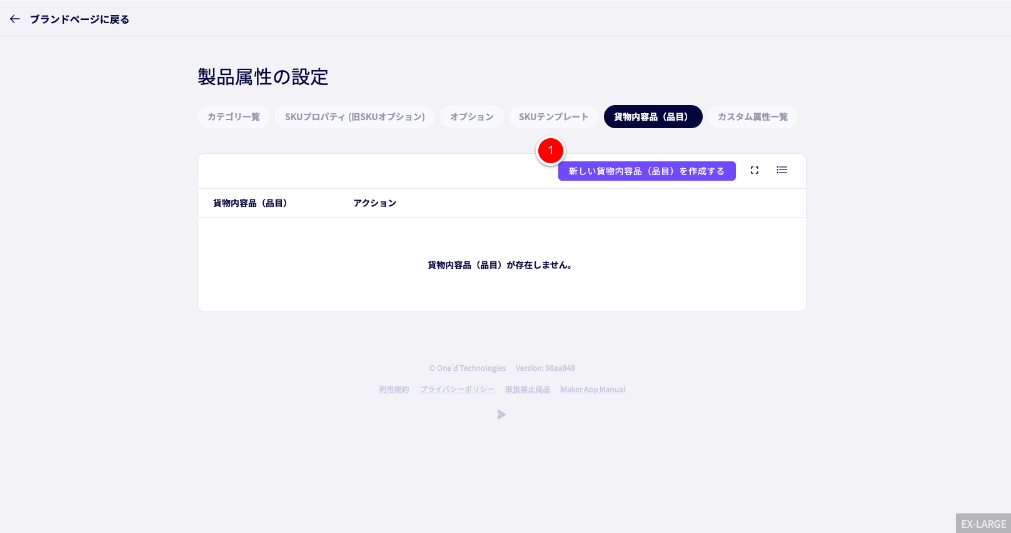
①Click on ‘Create a New Description Attribute‘.
Enter a new ②’Description Attribute‘
For example, enter ‘Mens jacket’ which will be displayed on commercial invoices.

After you are done, click on ③‘Create‘.
On the ‘Create a New Product‘ page, select the appropriate description from ④‘Content Description‘

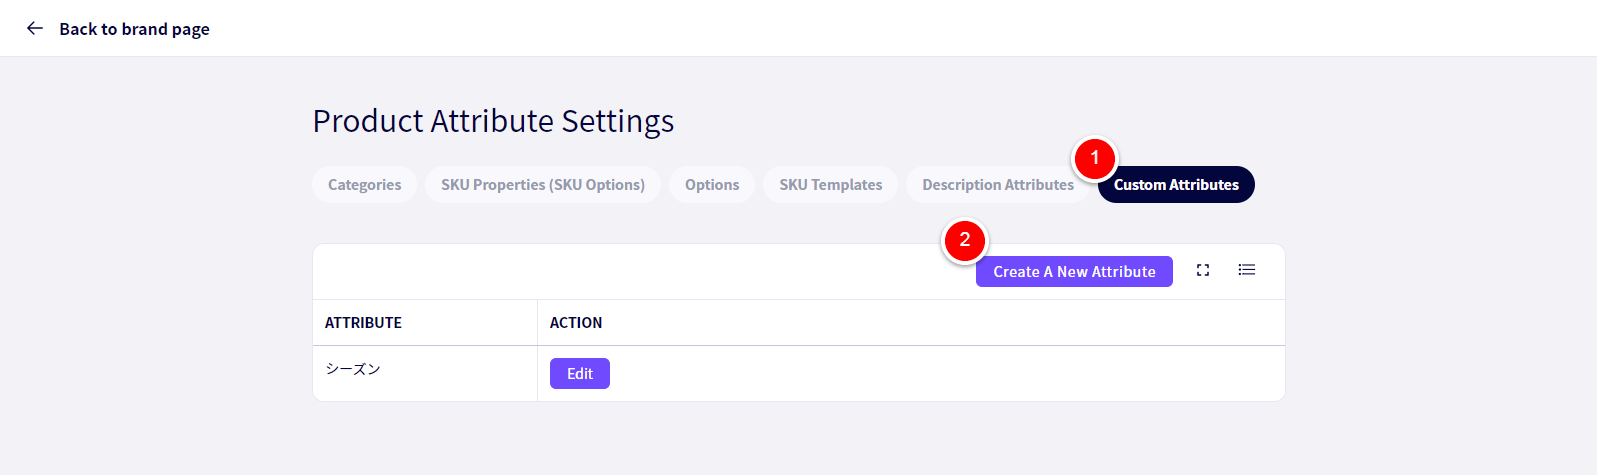
Custom Attribute settings
Custom Attributes are pieces of information or flags that you can apply to products freely. They can be set to be displayed or not be displayed to Buyers, so can be used to carry pieces of information over to a product such as the factory it was produced in or the material it is made from.
As an example settings, if we wish to keep track of all products made of a specific material, we will make a Custom attribute called ‘Material1’.
First off, select ①‘Custom Attributes‘.
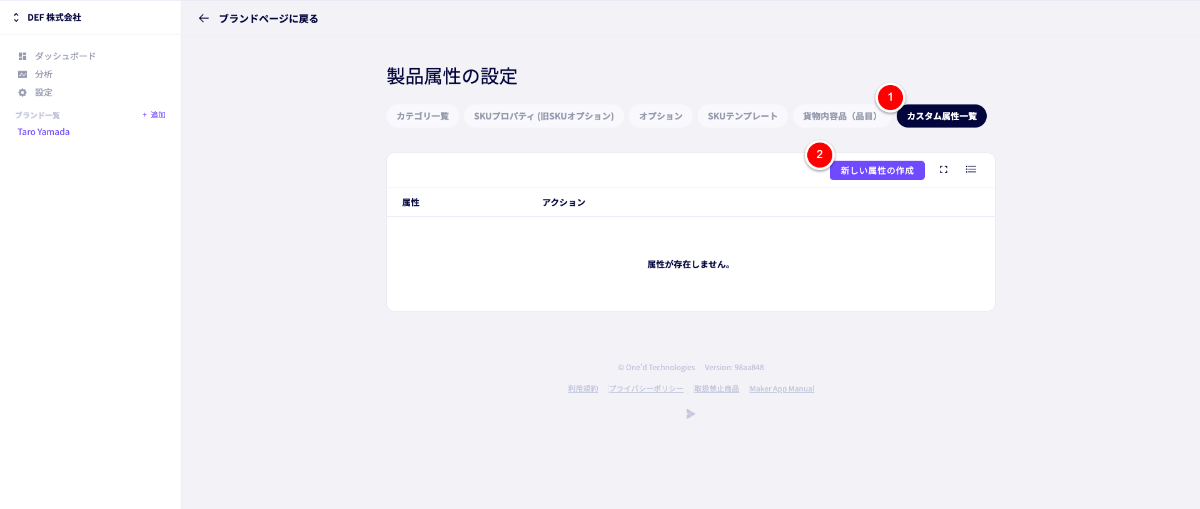
Following that, select②‘Create a New Attribute‘.

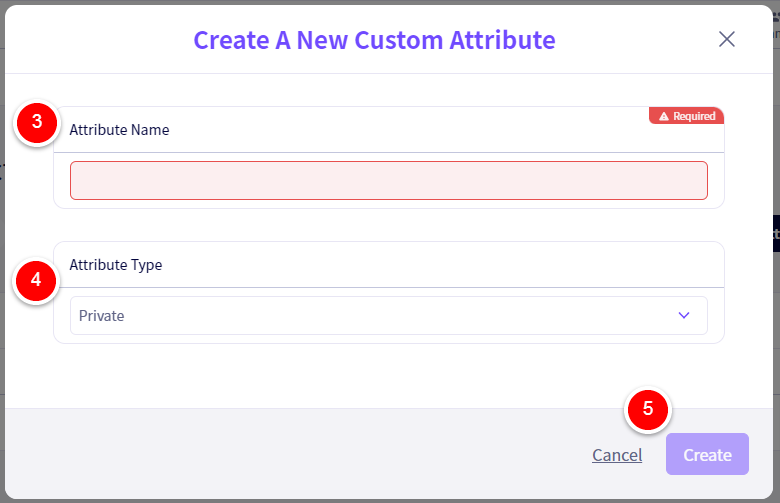
Enter ‘MATERIAL1’ into the ③‘Attribute Name‘ field.
From ④ ‘Attribute Type‘ Select if you want this to be a public or private attribute.
Click on ⑤‘Create‘
Custom Attribute settings
Custom Attributes are pieces of information or flags that you can apply to products freely. They can be set to be displayed or not be displayed to Buyers, so can be used to carry pieces of information over to a product such as the factory it was produced in or the material it is made from.
As an example settings, if we wish to keep track of all products made of a specific material, we will make a Custom attribute called ‘Material1’.
First off, select ①‘Custom Attributes‘.
Following that, select②‘Create a New Attribute‘.
Enter ‘MATERIAL1’ into the ③‘Attribute Name‘ field.
From ④ ‘Attribute Type‘ Select if you want this to be a public or private attribute.
Click on ⑤‘Create‘
Bulk Product registration
It’s possible to register products one by one on DEXTRE (see here) but efficiency we will be bulk registering products.
Creating a Bulk Create Template
DEXTRE is a user-defined type system.
First, we must create an import template set up for the data we wish to import.
※ A sample template, already filled out, is available to download below.
Click on ① ‘Products‘ followed by ② ‘Import Templates‘.
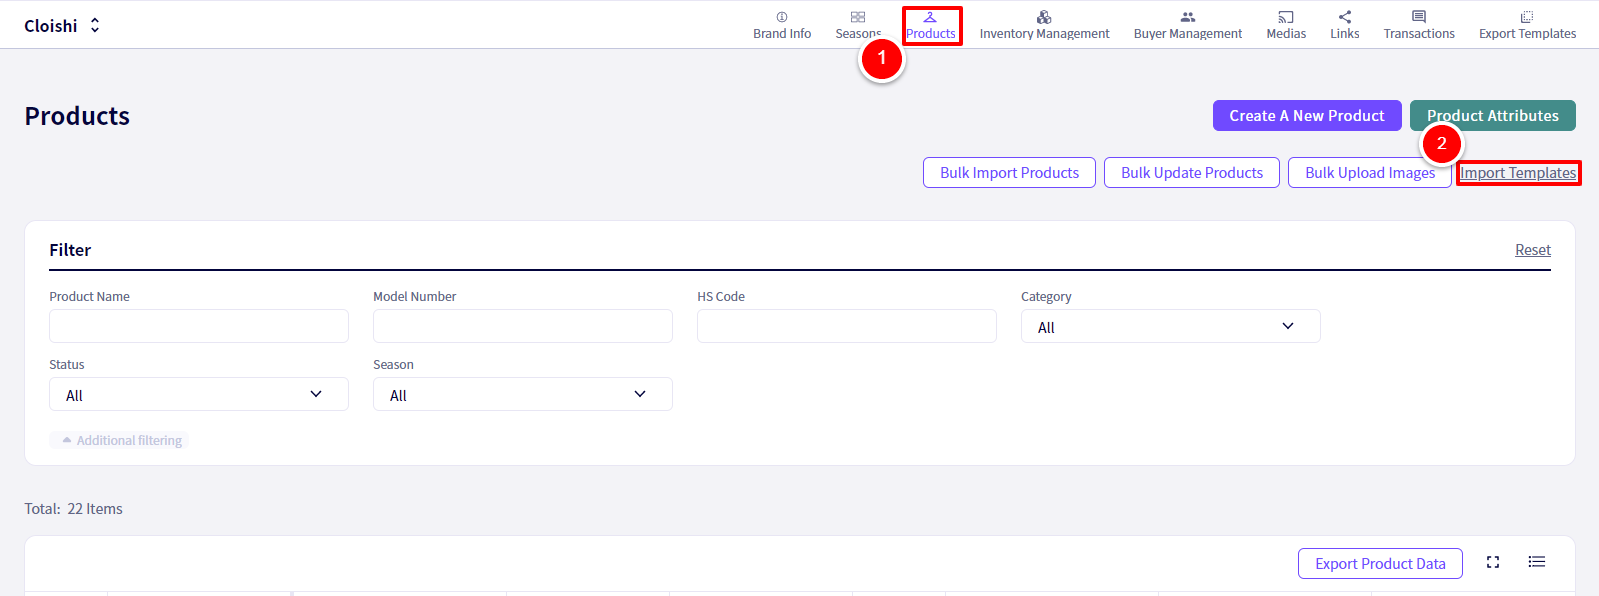
You will be redirected to the following page.
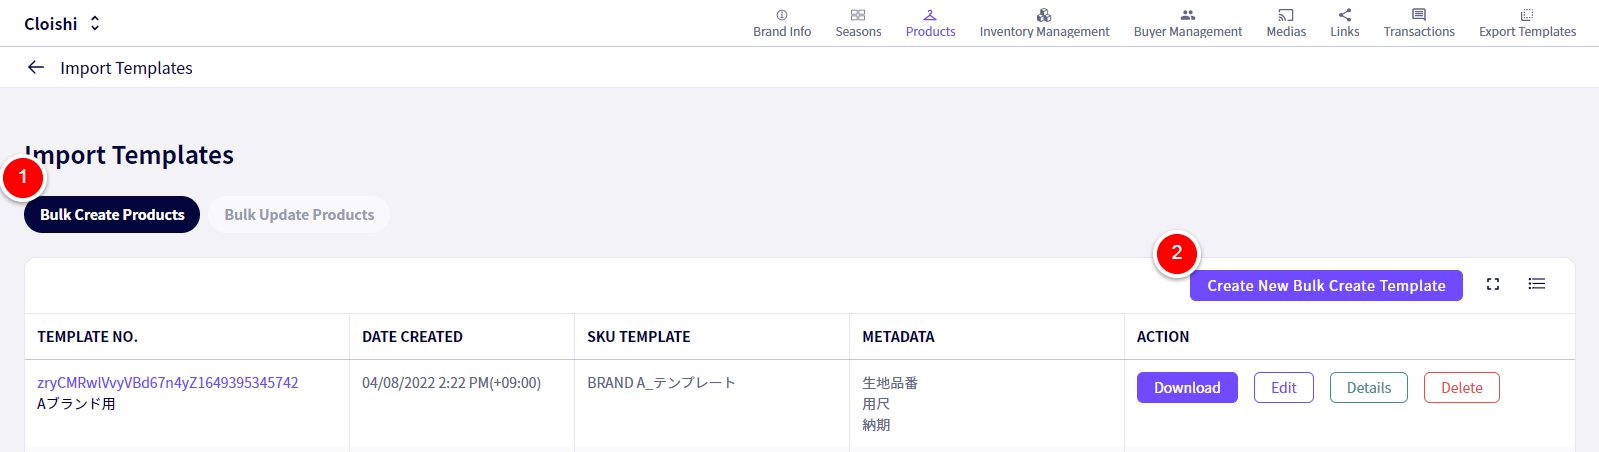
Select ① ‘Bulk Create Products’, followed by ② ‘Create New Bulk Create Template’
■ We can now create an import template set up for the data we wish to import.(Not everything that can be selected is required to be, only select the types of data you wish to import).
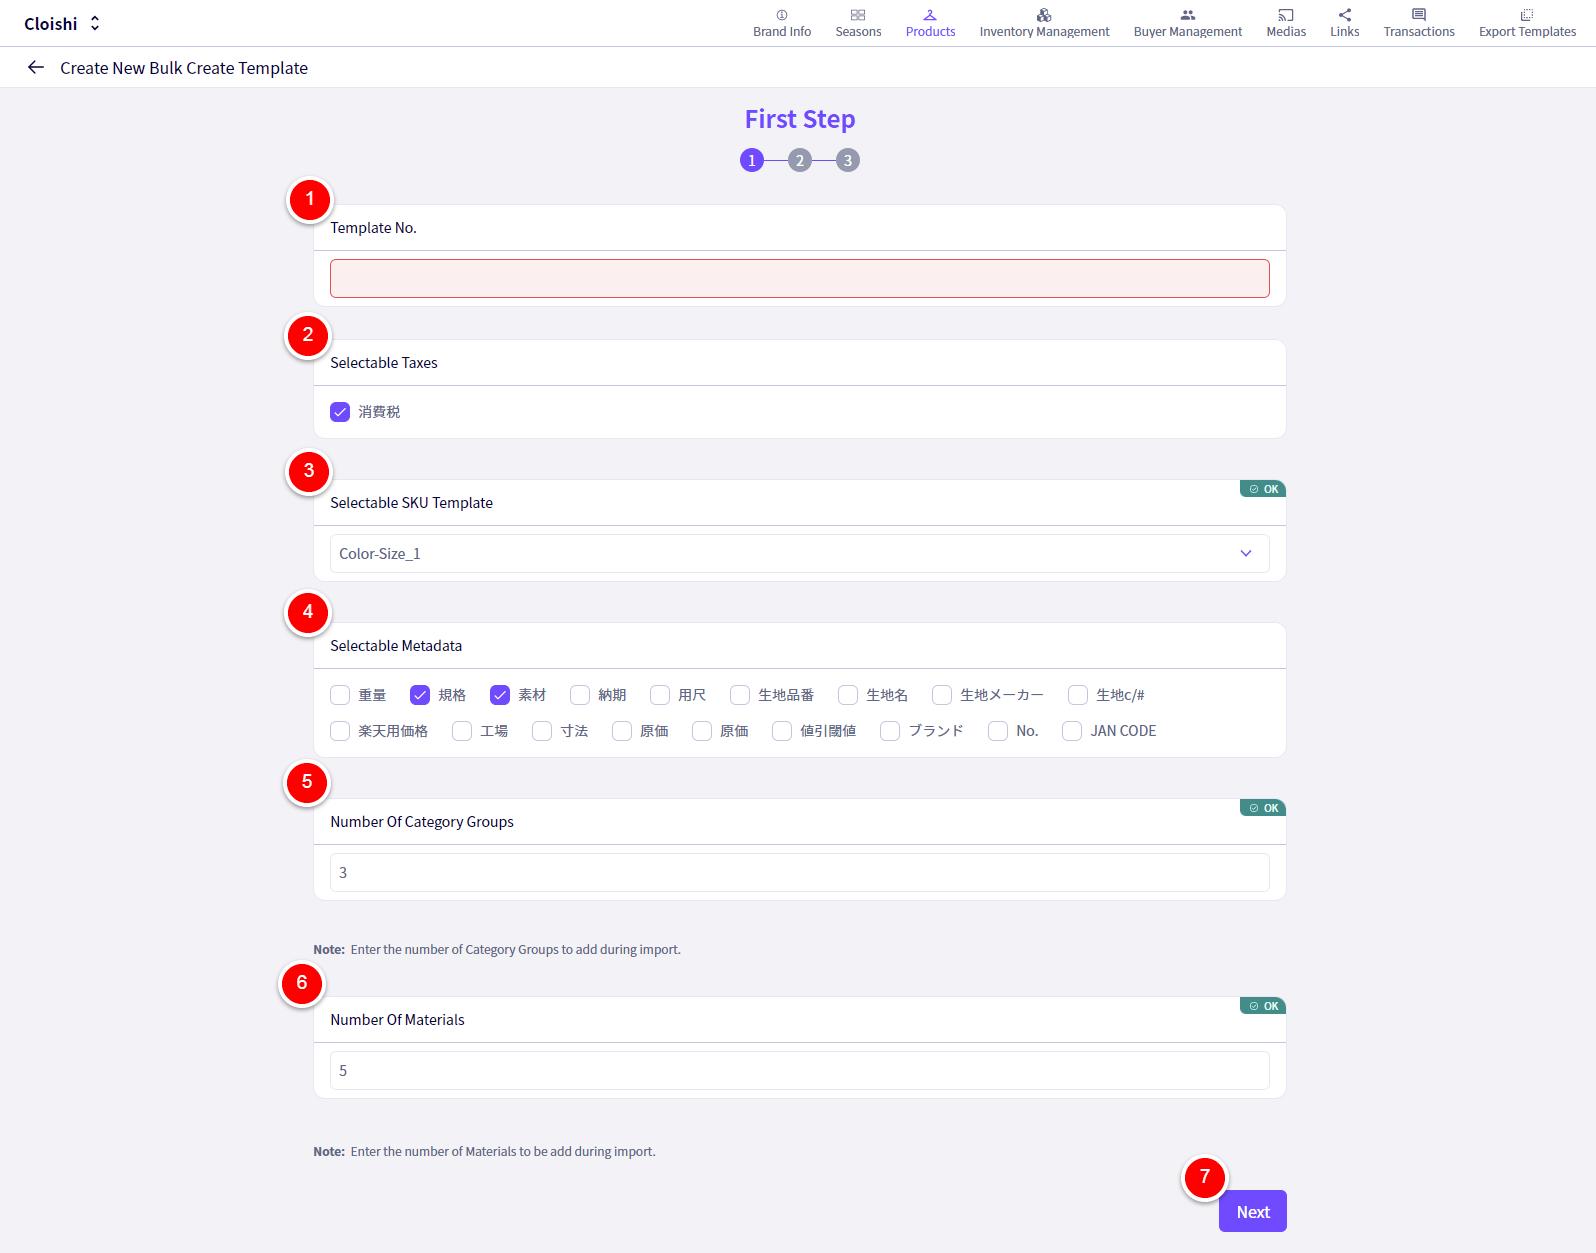
① Template No. Set a name here.
② Selectable Taxes Enable this if you wish to apply Taxes.
③ Select an SKU Template
④ Selectable Metadata Select all metadata (Custom Properties) you wish to have available to the products you are going to import.
⑤ Enter the Number of Category Groups to add during import.
※A Category group is defined as one set of ‘Category -> Subcategory -> subsubcategory’
For example,
❶ Category 1 : Mens > Subcategory 1 : Outer > Subsubcategory 1 : Jacket
❷Category 2 : Collaboration
In a case like the above where you wish to apply those categories to a single product, enter 2
Even selecting 2, not every product will need to be in two, or even any category when you import the information.
⑥ Enter the Number Of Materials you wish to have available to the products you are going to import.
※A Material is defined as one set of ‘Material Type -> Material Name -> Material Parts Name’
For example,
❶ Material_PartsName1 :Main / Material_Name1 : Wool 50% Cotton 50% / Material_Type1 : KNIT
❷ Material_PartsName2 :Lining / Material_Name2 : Cupra 100% / Material_Type2 : WOVEN
❸ Material_PartsName3 :Sleeve Lining / Material_Name3 : Cupra 100% / Material_Type3 : WOVEN
In the above case enter 3.
Even entering 3, not every product will need to have three, or even any materials when you import the information.
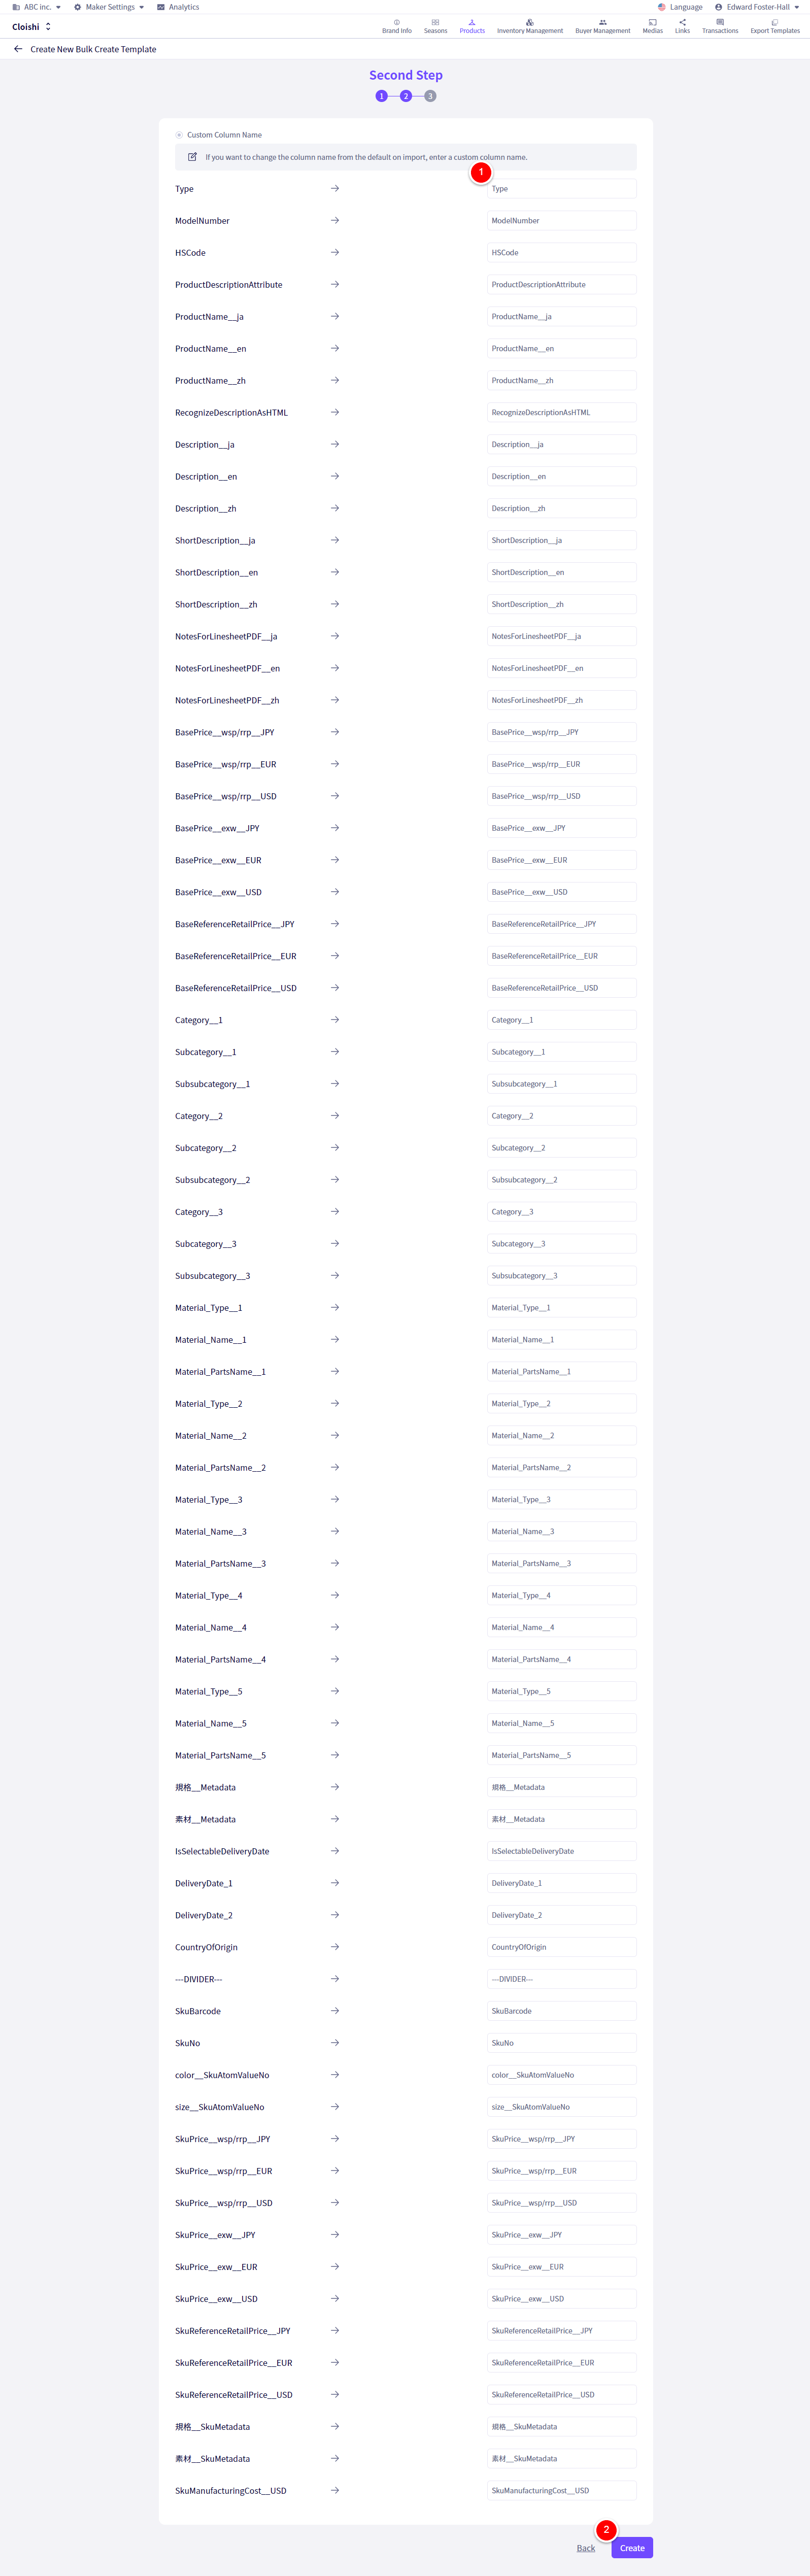
■ You can customize the header names to your liking.
After customizing the ① Column Names to your liking, click on ② ‘Create’.
Downloading the excel template
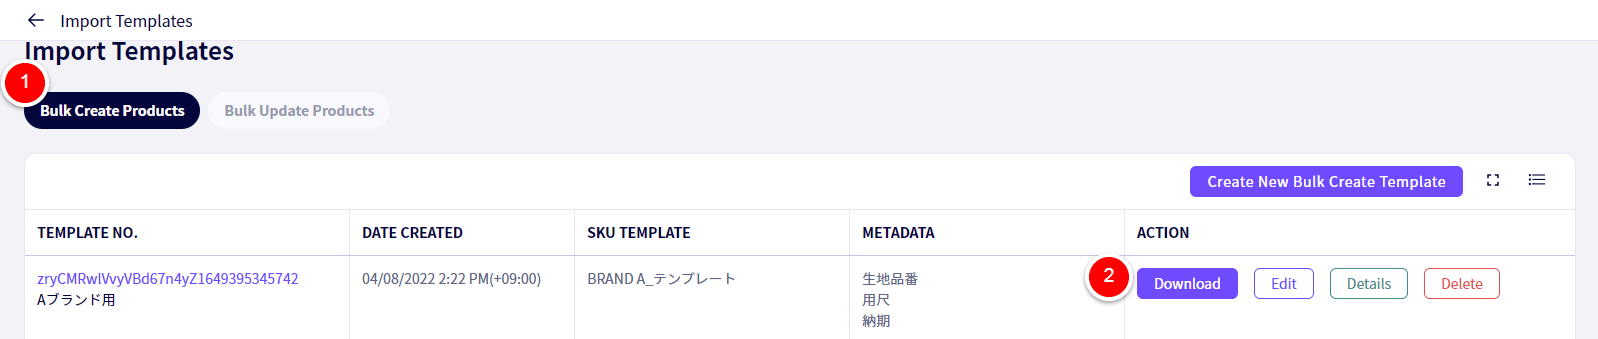
■ Excel templates can be downloaded from Import Templates
Select, ①‘Bulk Create Products‘ the click ②‘Download‘ for the applicable template.
a file with the name product_bulk_create_import_日付OOOO-O-OO.xlsx will be downloaded.
A sample template, already filled in, can be downloaded below.
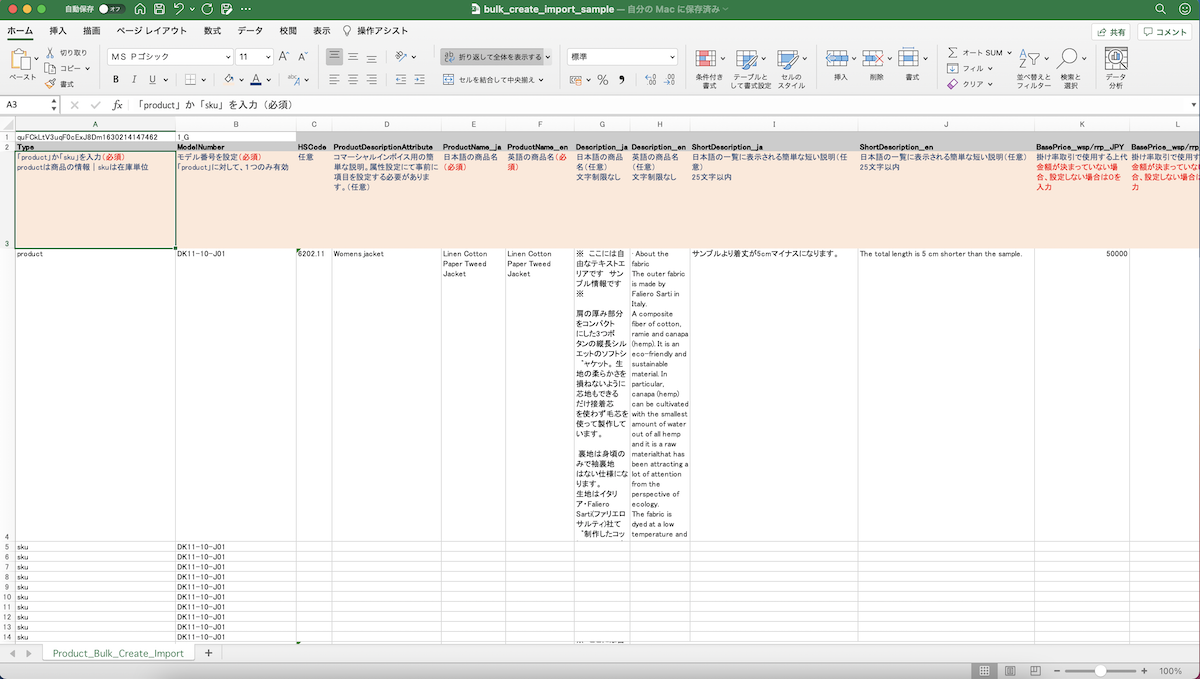
Uploading the completed excel template
After downloading the excel import template file, complete it with the appropriate data and then follow the below steps and upload it to DEXTRE.
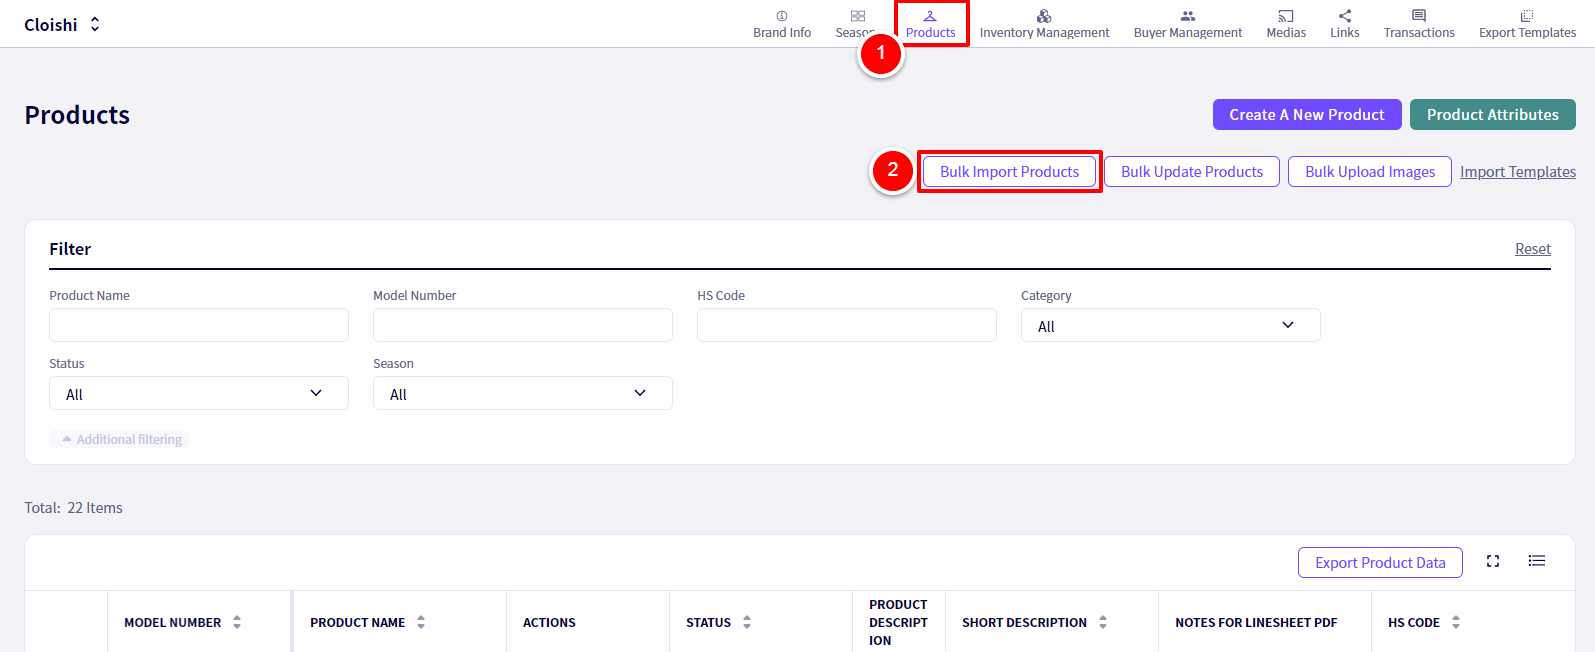
Go to ① ‘Products‘, then click ② ‘Bulk Import Products‘.
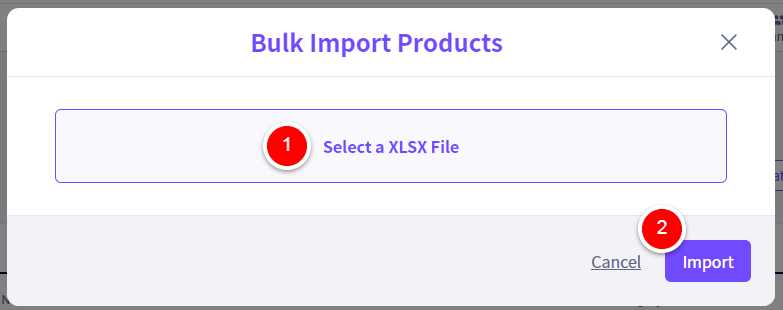
Click on ① ‘Select a XLSX File‘
Select the completed excel template,
then click the ②‘Import‘ button.

If you see【更新完了しました】at the bottom of your screen, you have successfully imported your products.
If after this your products are still not visible, refresh the page
For Windows「F5」
For Mac「Command」+「R」
Bulk Image Upload and automatic linking
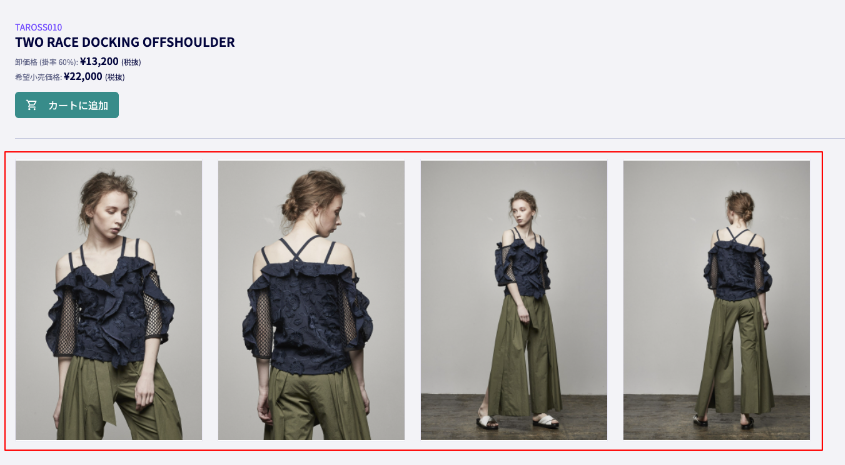
■ Product Images
Model Number_i_1.jpg / Model Number_i_2.jpg / Model Number_i_3.jpgThe numbers after i should start with 1and increase linearly. All numbers must be unique for any single Model Number. In between the Model Number and the number please enter “underscore(_)”+”i”+”underscore(_) ” then the file extension. (jpg, png, etc)
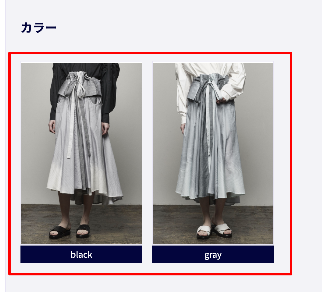
■ Product Symbol Image(The images linked to particular colours, etc)
Model Number_ibs_SKU Property Value No..jpgBetween ‘Model Number‘ and’SKU Property Value No.‘ , enter “underscore(_)”+”ibs”+”underscore(_)”, then the file extension(jpg, png, etc)
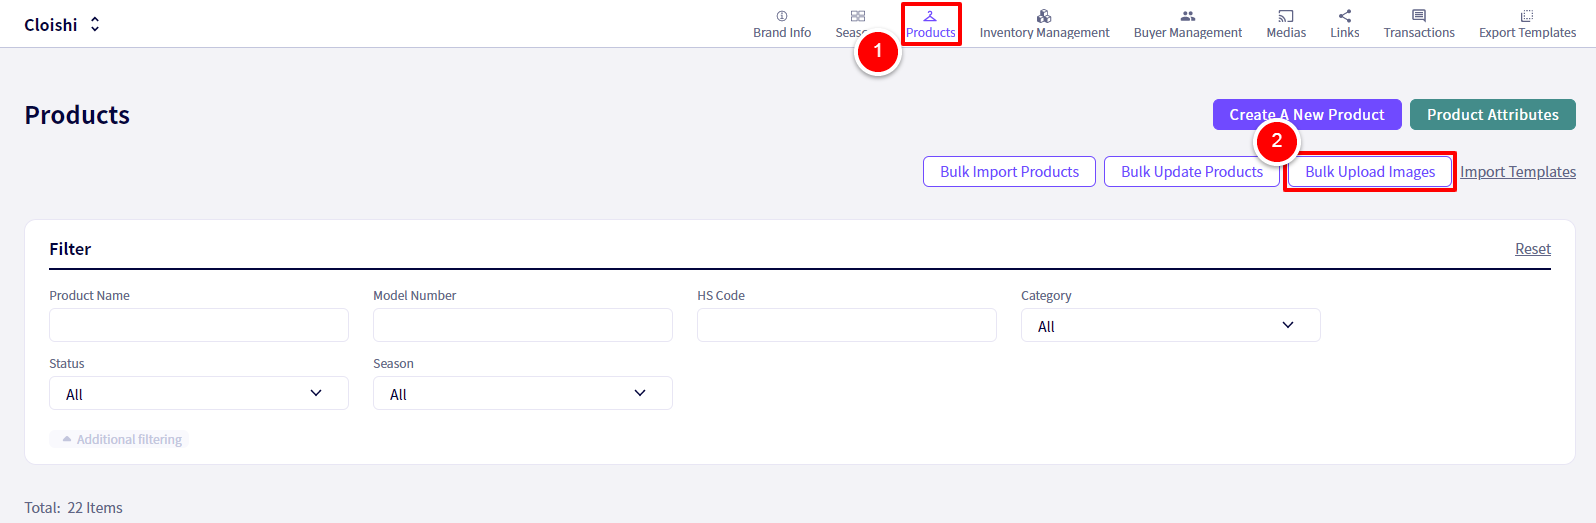
Click on ①‘Products‘ followed by ② ‘Bulk Upload Images‘
After choosing which orientation you wish to use for your images, click on ‘Select Images‘ then select all the images you wish to upload, before clicking on the ‘Upload‘ button.
Caution
- The products you wish to add images to must already be registered.
- When adding symbol images, if the SKU Property Value No. is incorrect, an error will be produced.
- If adding images to products which already have images associated with them, the previous images will be overwritten.
Making a Lookbook
This guide explain the process of making a Lookbook (photo album.)
Click on ①‘Brand Info‘, followed by ②‘Create a New Lookbook‘
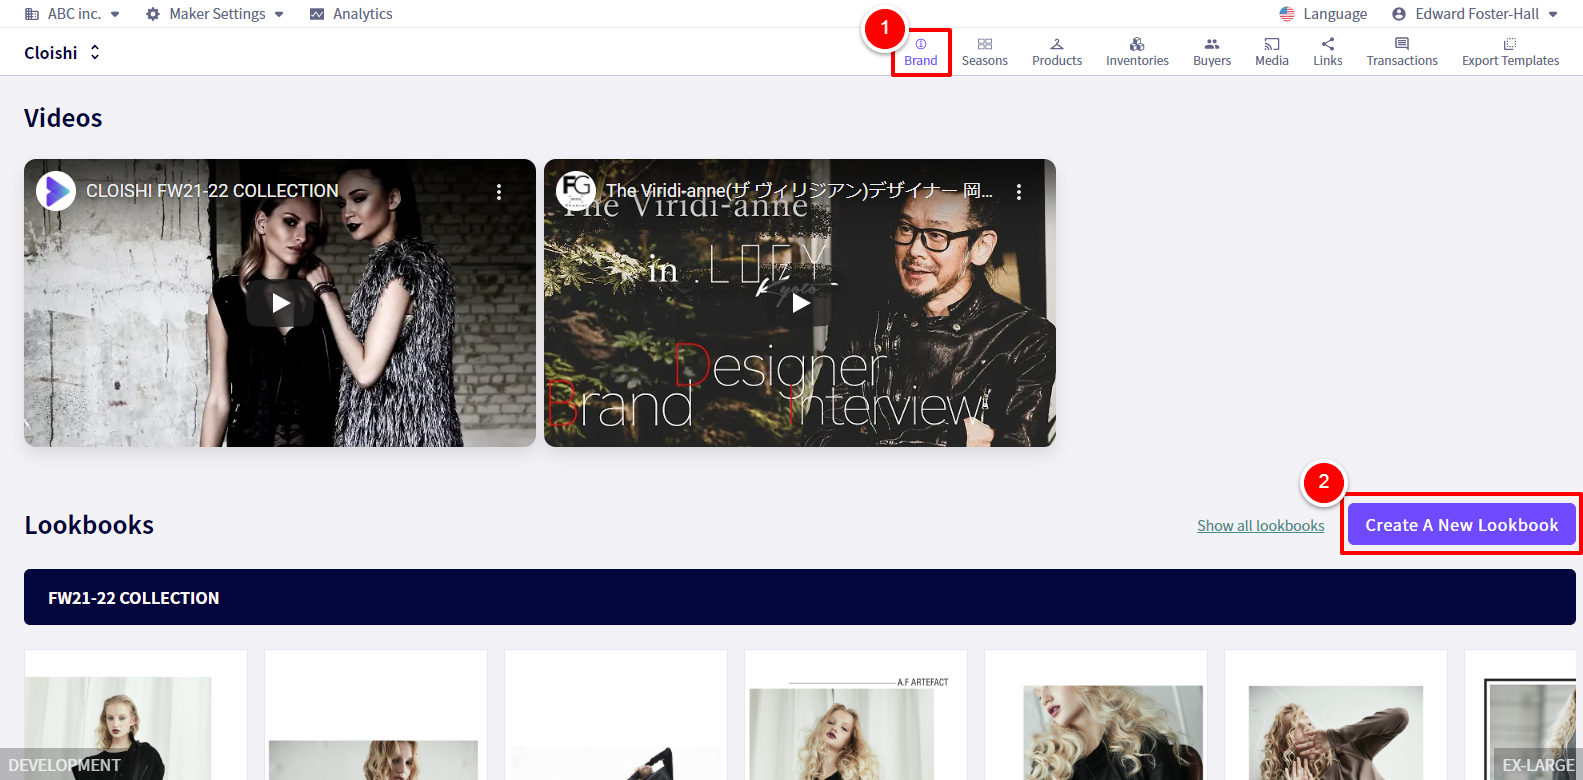
You will be redirected to the following page.
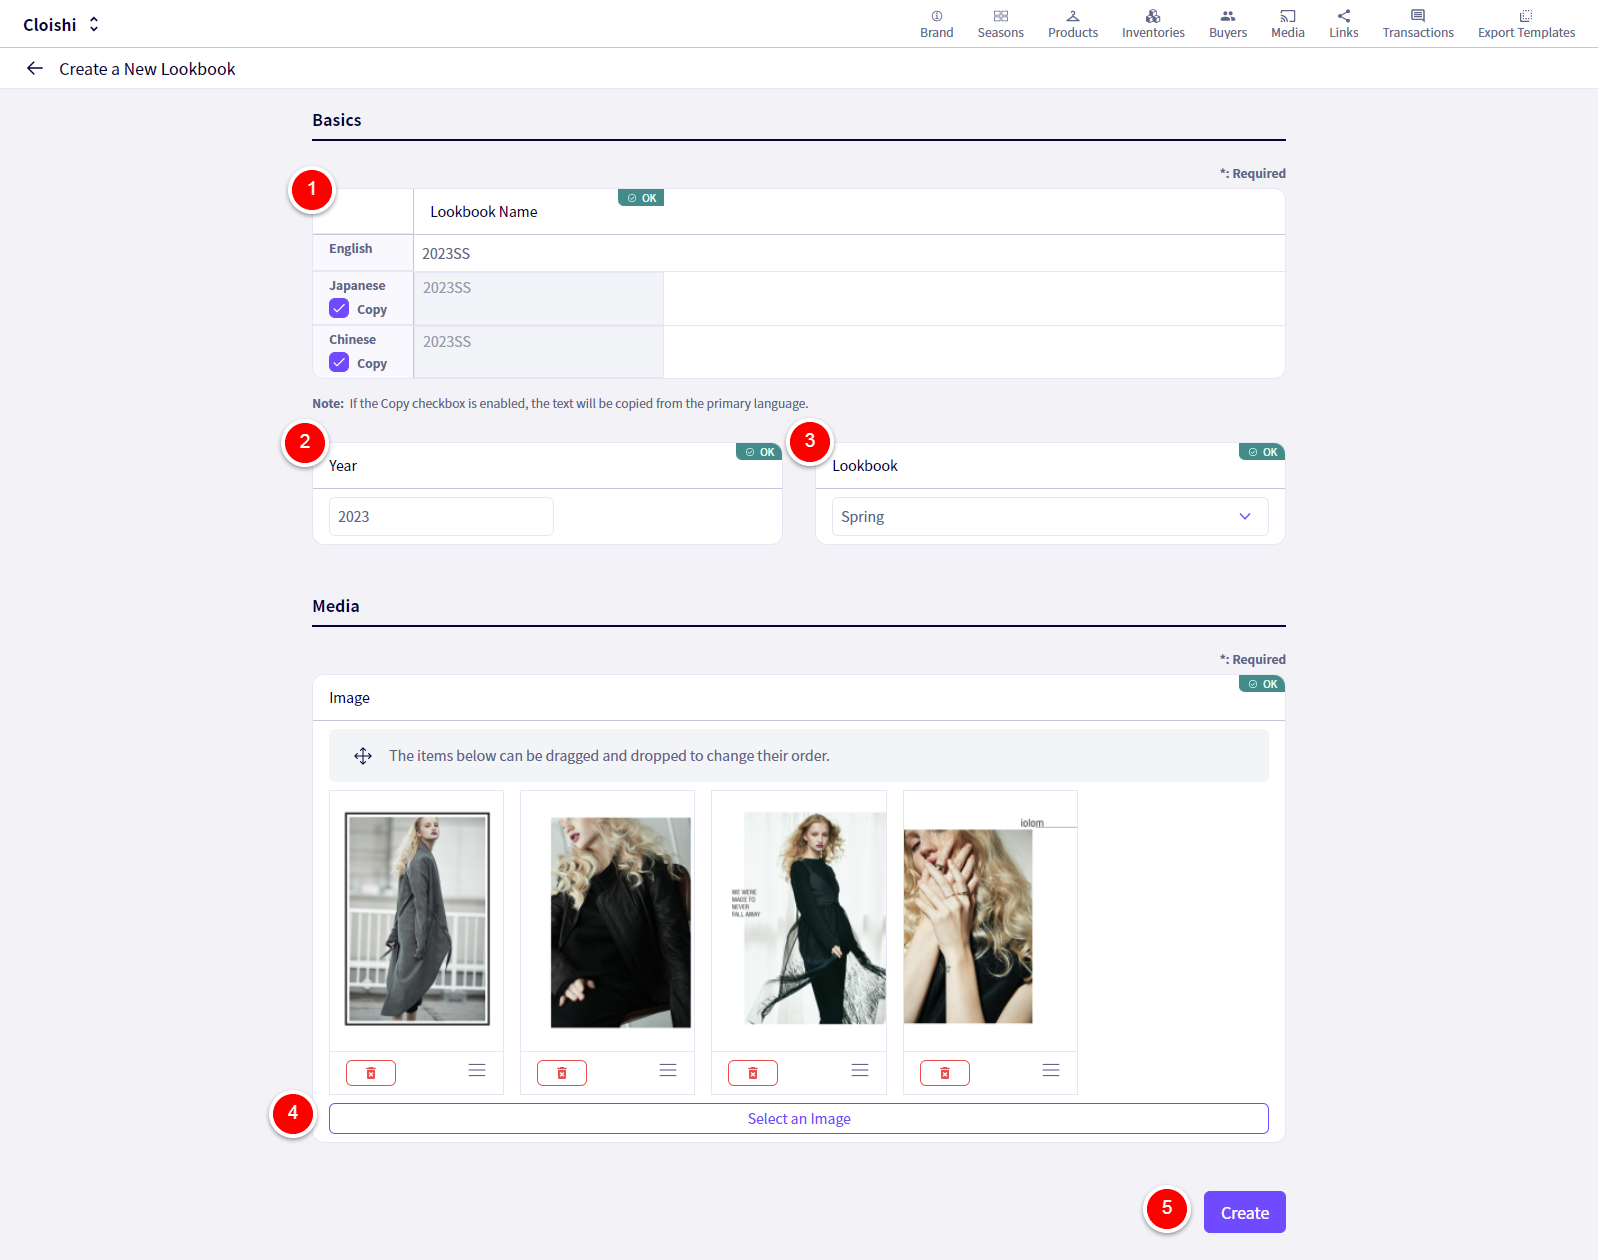
① Set a name here. This will be used as the title of your lookbook.
② Set a year.
③ Set a season.
④‘Select an Image‘ Click on this button, then select from previously uploaded images, or then select ‘Upload an Image‘ and choose images to upload.
※Images can be rearranged by dragging and dropping.
⑤‘Create‘ Click this when you are finished.
Making Instant Order Links
Instant Order Links
Using Instant Order Links, you can select one line sheet (season) and transaction terms, then share the link and take orders. You are also able to set a passcode.
You can share the link through social media or messaging apps.
First click on, ①【Links】followed by ② 【Instant Order Link】and then ③ 【Create A New Link】

You will be redirected to the following screen.
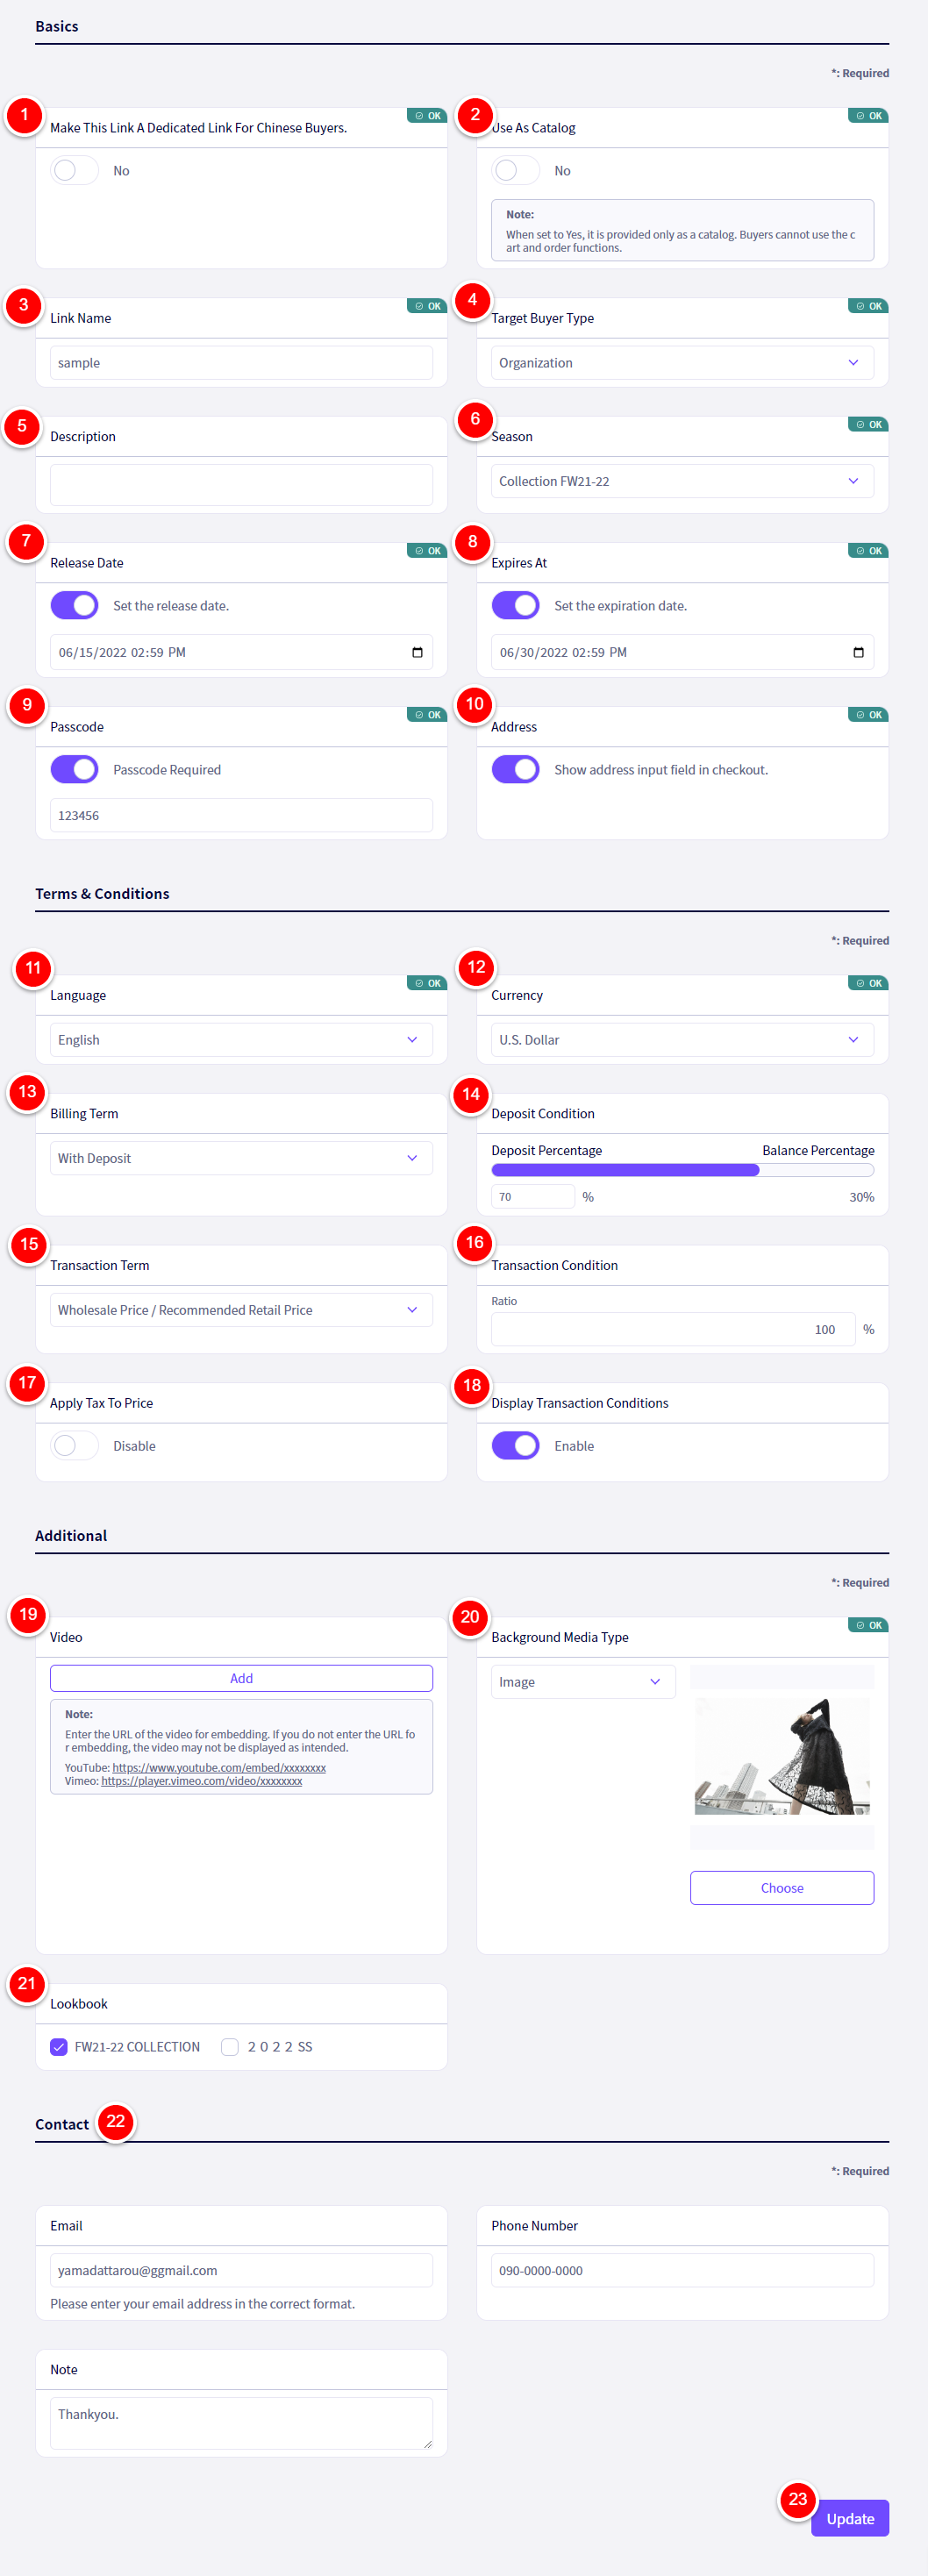
① Make this Link A Dedicated Link For Chinese Buyers Turn this on if you wish to use this link for Buyers from China. Please note that if this is turned on, only buyers from China will be able to use the link generated.
②’Use As Catalog’ Enable this to use this link as a catalog.
If used in catalog, the cart button will not be displayed.
③‘Link Name‘ Set a name for the link here.
④‘Target Buyer Type‘ Select a target buyer type.
※【Organization】means a B2B transaction
【Personal】means a Personal order (from a friend, etc.)
⑤‘Description‘ A description of the link.
This is not required.
⑥‘Season‘ Select the season you wish to make available through this link.
⑦’Release Date’ After the date and time you set here, people will be able to use this link.
⑧‘Expires At‘ After the date and time you set here, people will no longer be able to use this link.
※ Seasons also have Order deadlines separate from this. If the link is still active but the Order deadline for the season has past, people who access the link will be able to view, but not order, products from that season.
⑨‘Passcode‘ This can be enabled or disabled.
※ If enabled, the person accessing the link will need to enter the passcode you set here
⑩‘Description‘ A description of the link.
This is not required.
⑪Select which language you wish to enable.
⑫Select which currency you wish to enable.
⑬‘Billing Term‘ Select ‘With Deposit’ or ‘Without Deposit’
⑭’Deposit Condition’ Here you can set the deposit percentage you require on orders.
⑮‘Transaction Term‘ Choose which transaction terms you wish to apply to this link.
※ In the case of WSP/RRP, the ⑯‘Transaction Condition‘ will be to decide the rate, for any other transaction terms, this will be to decide a rate of discount.
⑰‘Apply Tax To Price‘ If you wish to include the price with tax, enable this.
⑱‘Display Transaction Terms‘ If you wish to display the transaction terms to the Buyer, enable this.
⑲‘Video‘ Add a video link here to a video you wish to display.(See how to upload a video here)
⑳ ‘Background Media Type‘ Select what type of media you would like displayed when someone is on the login screen in the case of a passcode being required, or the screen they will see if they use the link after it has already expired.
「Empty」… Nothing
「Image」… Set an image to use in the background. A high resolution is recommended.
「Video」… If you don’t add a repeat tag to the end of the video URL, the video will stop when its run time has elapsed.(Background video settings)
㉑‘Lookbook‘ If you wish to have lookbooks attached here, select them here.
㉒ Contacts / This information will be displayed to the person accessing the page as contact information.
㉓ Once done, click on Update
You can find a sample instant order linkhere.
Passcode:123456
If you have any questions, please contact us using the
Inquiry form
If you are in a hurry or need assistance by phone, please contact us at
050-1791-8946